Thank you for purchasing our plugin.
If you have any questions that are beyond the scope of this help file, please leave a message at the plugin's comment section at codecanyon.
Don't forget to rate the plugin if you like it.
Thank you so much!
Overview
With Calendar Anything WordPress plugin you can show any existing WordPress custom post type in a calendar.
Why use Calendar Anything WordPress plugin?
If you have a site and you already have an event plugin to manage your events, then you can show these events easily in cool calendars at your site (eg. in a widget, a page, etc.). Very useful for sites like gyms, schools, bars, restaurants, concert halls, etc.
Features
- Multiple calendar viewsChoose between month, agenda, list and basic view.
- Attach custom post typesYou can show any custom post type in your calendar.
- Attach multiple post typesYou can show multiple custom post types in the same calendar.
- Attach all events or selected onlyYou can attach all events that belong to a custom post type or just the ones you select.
- Unlimited calendarsCreate as many calendars as you desire.
- Ready-to-use themesChoose between 11 ready-to-use themes and make cool calendars on the fly!
- Multiple calendars on same pageYou can use multiple calendars on the same page.
- Customizable calendarsYou can customize each calendar separately.
- Unlimited styling optionsStyle the calendar the way you want! Choose background color, borders, margin, padding options and many, many more.
- Google fontsSelect from a large library of Google fonts and set the desired typography for all your calendar texts.
- Date RangeYou can set the calendar’s date range. All events outside the date range are hidden and the navigation buttons are deactivated.
- ToolbarChoose the navigation buttons that you want displayed on the toolbar.
- Event filteringYou can add a filtering dropdown and give the user the abillity to show specific events only.
- Custom fieldsYou can show custom fields in the event templates (compatible with any custom field plugin like ACF, Types, etc.).
- Event limitIf you have a large number of events in the same day, you can set an event limit.
- Event coloringIf you want, you can add colors to your event taxonomies and colorize your events according to their taxonomy colors.
- Event cachingEnable caching for calendar events.
- 2 event fetching modesGet calendar events by using ajax or by prerendering all of them.
- TooltipsYou also have the ability to add tooltips on your events.
- LocalizationDates and times in toolbar and in event template shortcodes respect your WordPress default language.
- ResponsiveWith our plugin you can create trully responsive calendars. Which means that on larger screen you can a different view than on smaller screens.
- Import/ExportExport and import your custom calendar themes easily and reuse them on-the-fly.
Installation
There are two primary methods for installing any WordPress plugin.
Install with a zip file
-
From your WordPress dashboard, choose
Plugins > Add New -
Select
Uploadfrom the set of links at the top of the page (the second link) -
From here, browse for the zip file included in your plugin purchase titled calendar-anything.zip and click the
Install Nowbutton -
Once installation is complete, click
Activate Pluginto activate it and enable its features.
Install by FTP Manager
If you are have no previous web experience and have no idea what an FTP Manager is, then this option is not for you.
- Access your host through the FTP manager
- Access the plugins directory of your WordPress install
/(WordPress directory)/wp-content/plugins/If WordPress is installed on the root folder the directory is
/wp-content/plugins/ - Find the directory titled calendar-anything.zip and upload it and all files within to the directory from the previous step.
- From your WordPress dashboard, choose
Plugins > Installed Plugins - Locate the newly added plugin and click on the
Activatelink to enable its features.
Quick Start Guide
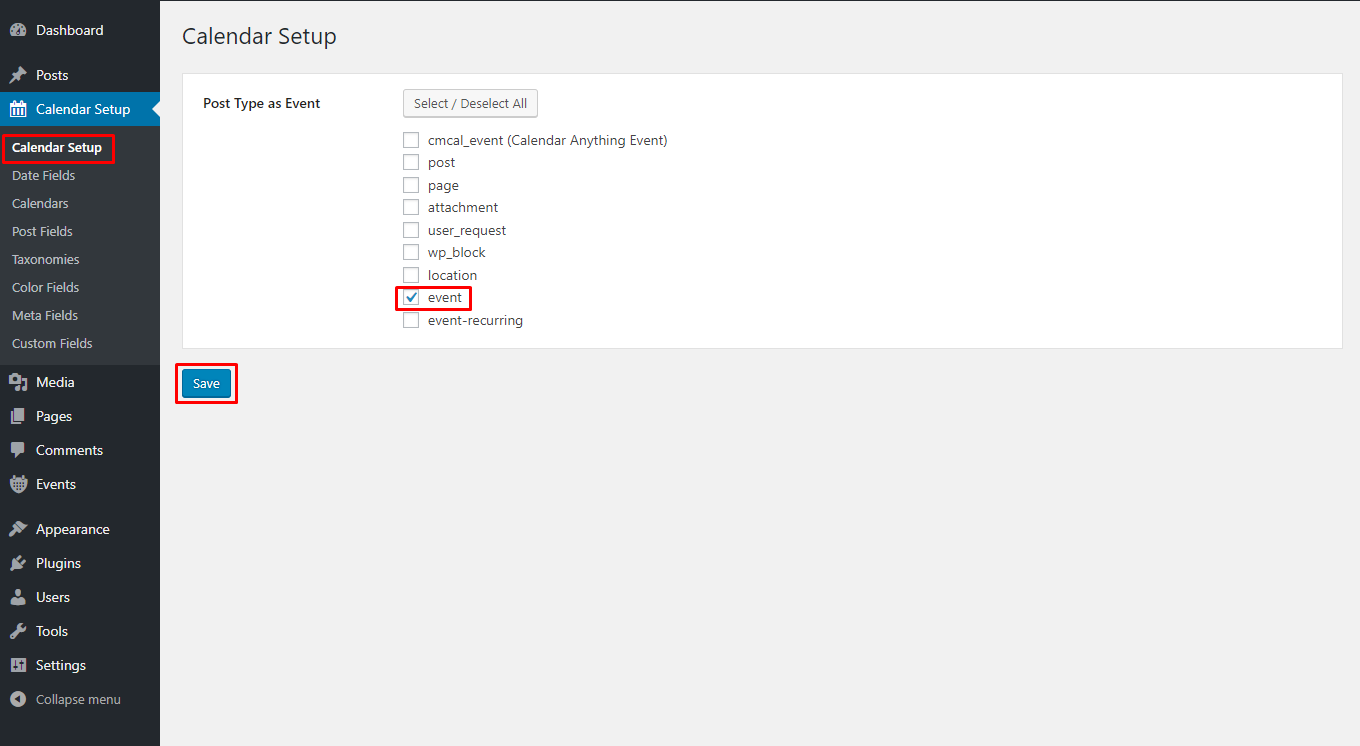
Step 1: Select a post type to show in the calendar
First and foremost, it is important to select the post type (or post types) that you want to show in the calendar. For example, you want to show the events that are created by an external plugin? Or do you want to show the WooCommerce products? Or both? Or something else?
To do so, at your WordPress backend, click the Calendar Setup button on the menu, select your post types and click save.
In our example, we have the Events Manager plugin and we want to show these events to a calendar.
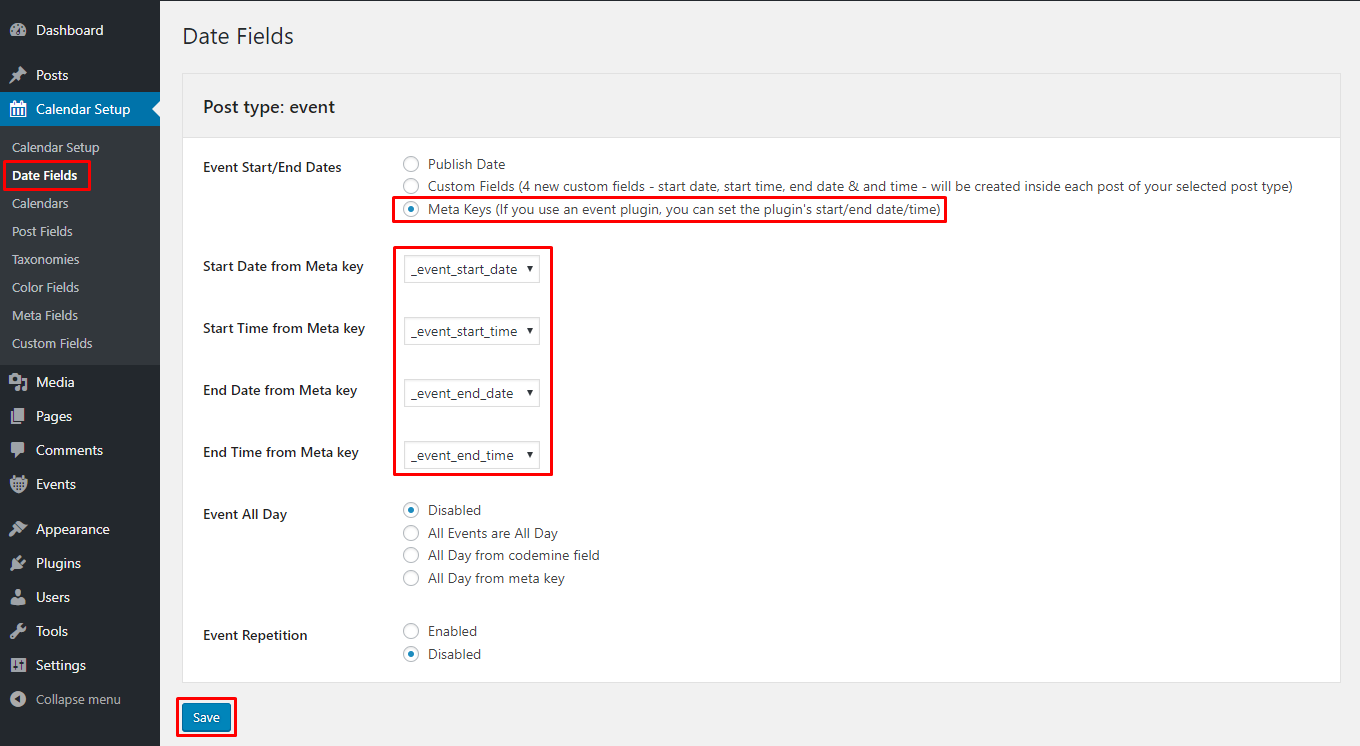
Step 2: Select event start/end dates
Now it is time to select the event start and end dates and times. Which fields are the ones that define these points? Are they some custom fields? Or just the event's publish date?
In our example, we want to set the dates and times according to the ones of the Events Manager plugin.
To do so, at your WordPress backend, click the Date Fields button on the menu and select the Meta Keys option. A list of 4 options will be populated below. Just select the desired fields and press Save.
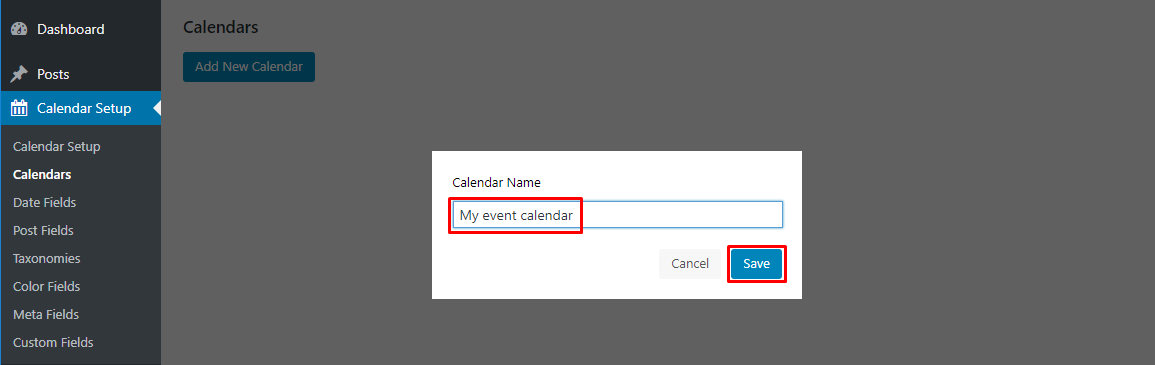
Step 3: Create the calendar
Go to Calendars and click the Add New Calendar button.

In the pop-up that appears, give a name for your calendar and press Save.
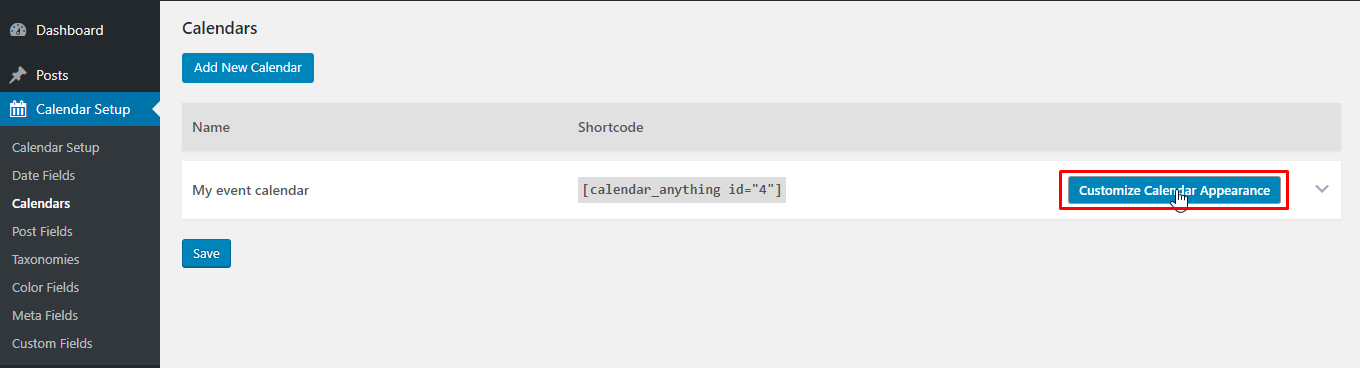
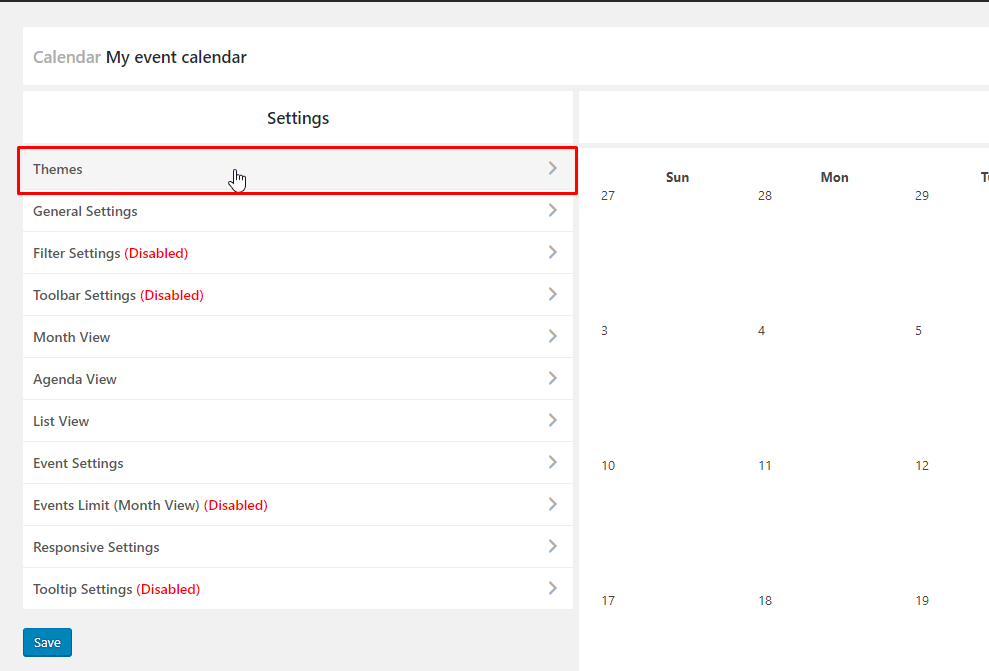
Step 4: Select a calendar theme
On the calendar that you have created, click the Customize Calendar Appearance button.
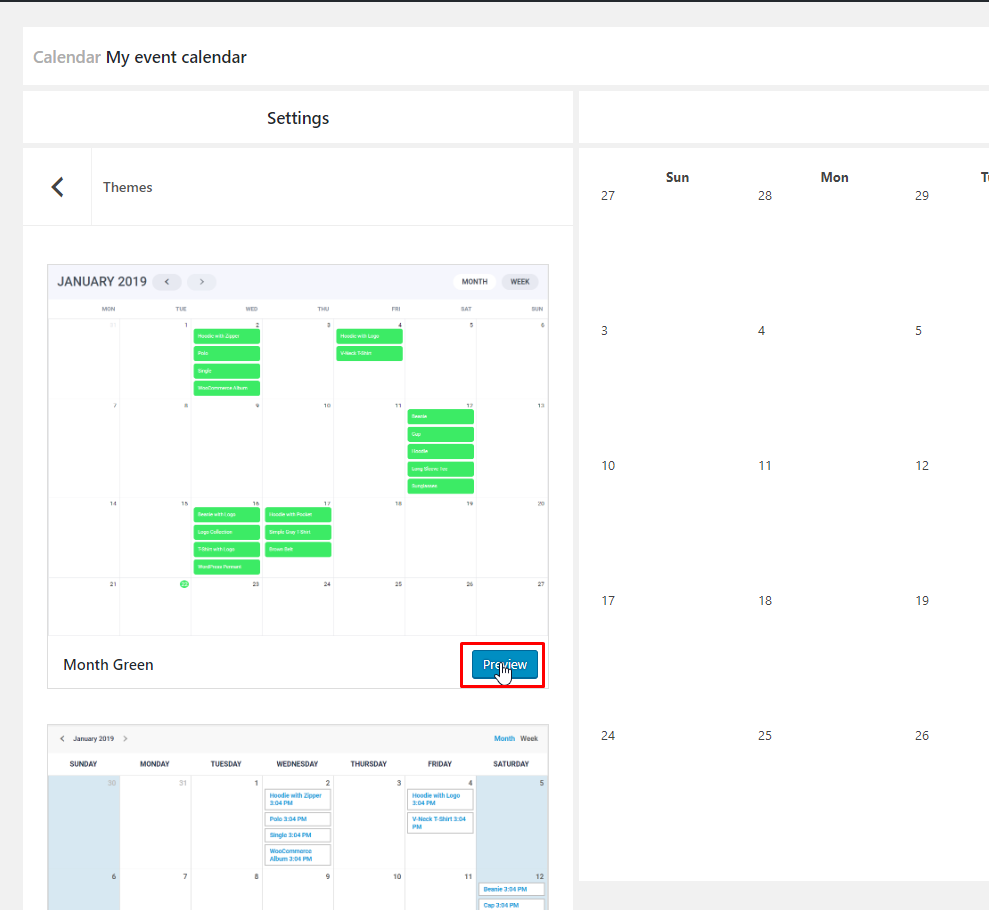
You are now on the calendar theme's settings page. Click the Themes button to see the available themes.
You can now click the Preview button on the theme you want to select. See if the theme suits you in general and click the Save button if you want to activate it and save it.
Step 5: Customize your calendar
You have now created your form style. If you want to further customize your form style, you can do so by going to the desired subsection (eg. General, Inputs, etc.), make the desired changes and click Save to save them.
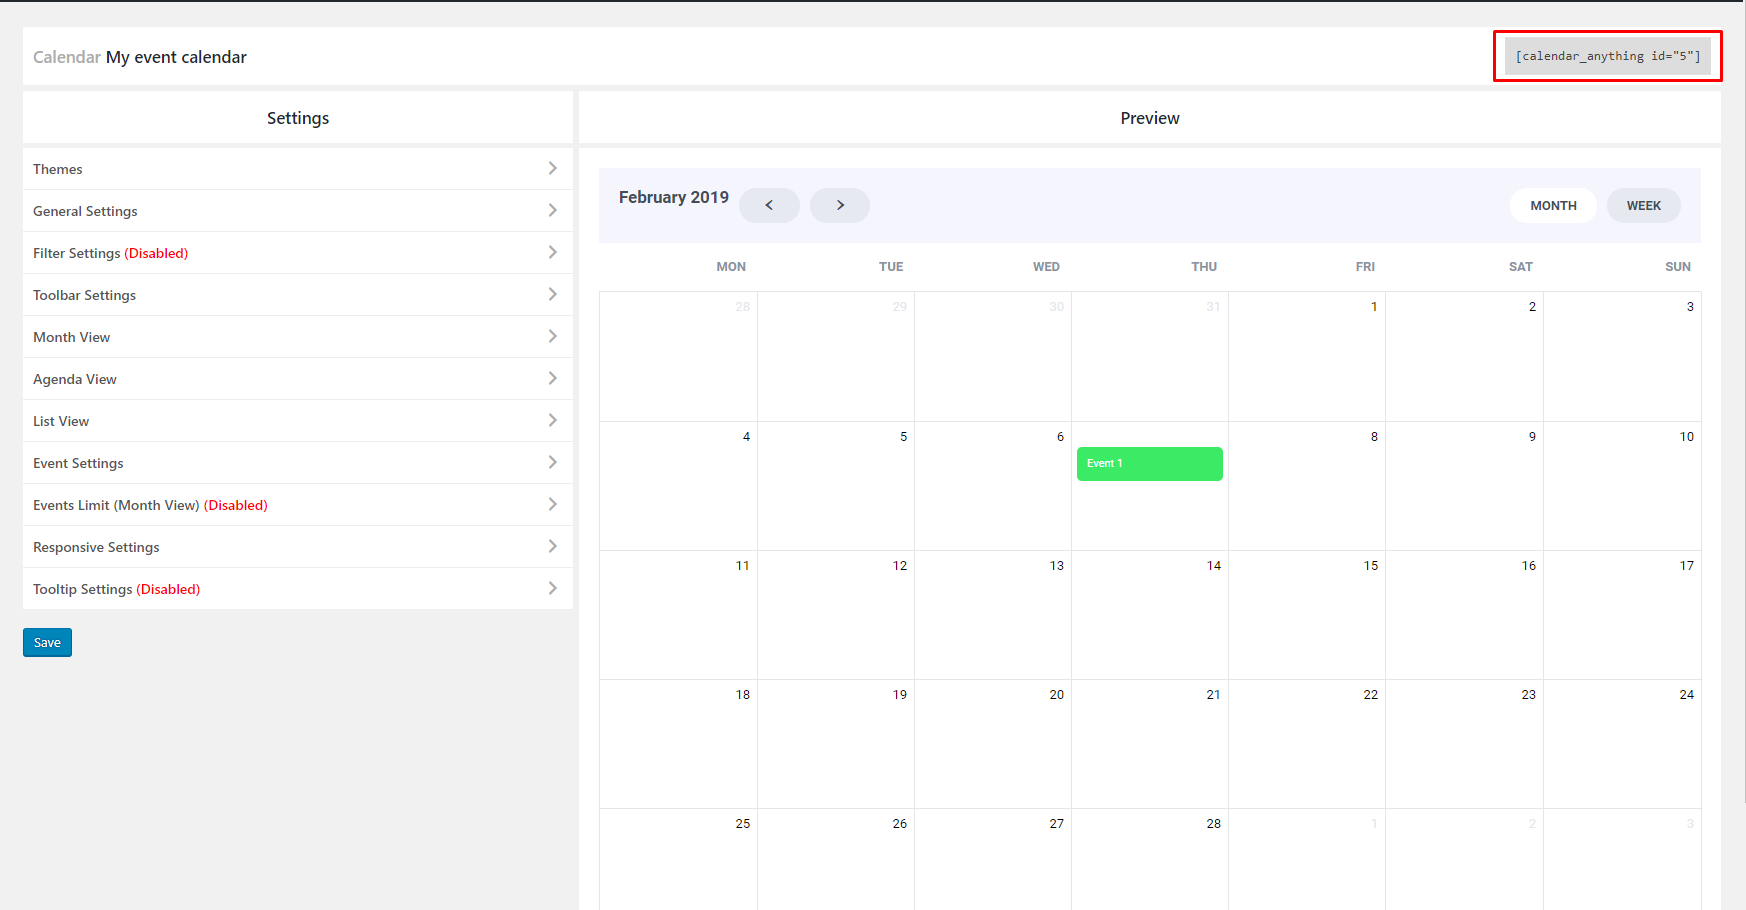
Step 6: Copy & paste the calendar shortcode
Copy the shortcode and place it at your site (eg. in a post content, a page content, a Visual Composer, a widget, etc.)
Terminology
In order to understand the available plugin options, let's see some terminology first.
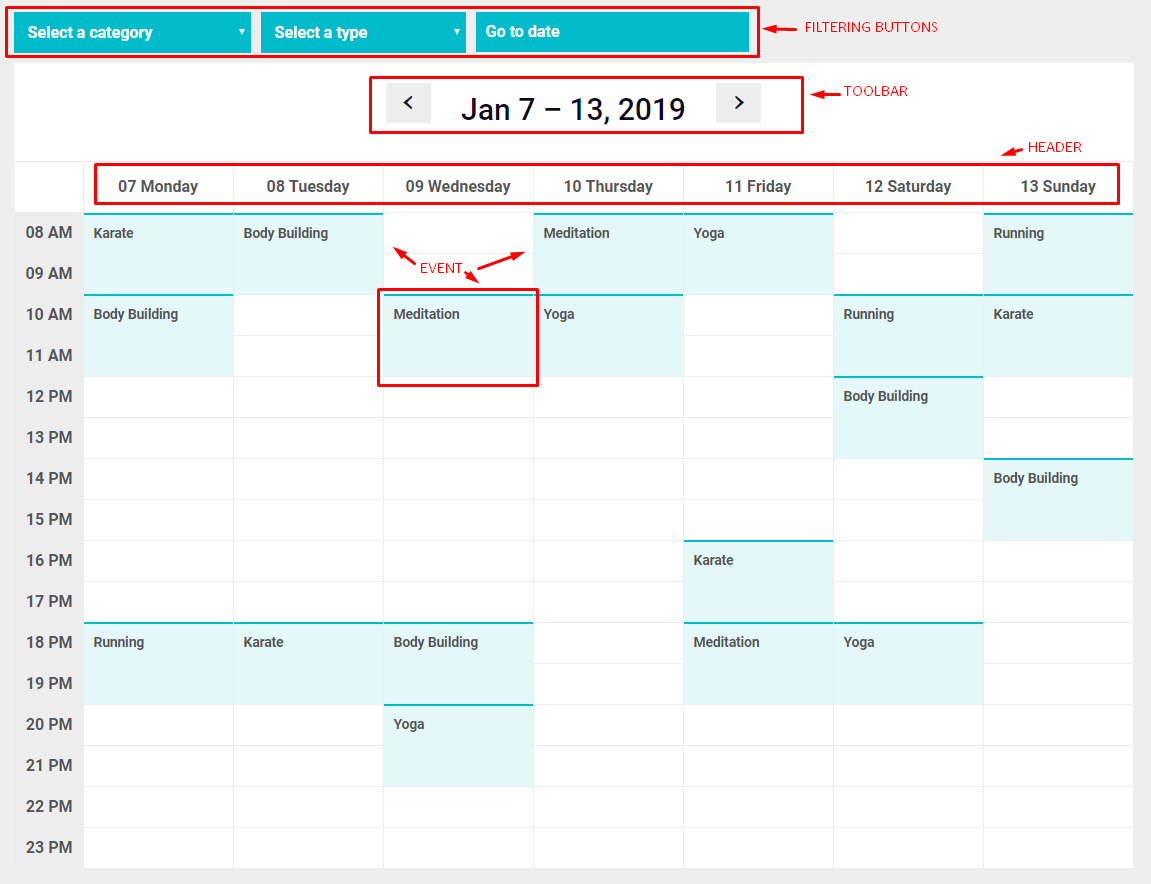
Calendar Elements
Each calendar is consisted of these elements:
- Filtering buttons
- Toolbar
- Header
- Events
The Views
You can select between a number of different views for your calendar according to your preference. Here are the available views.
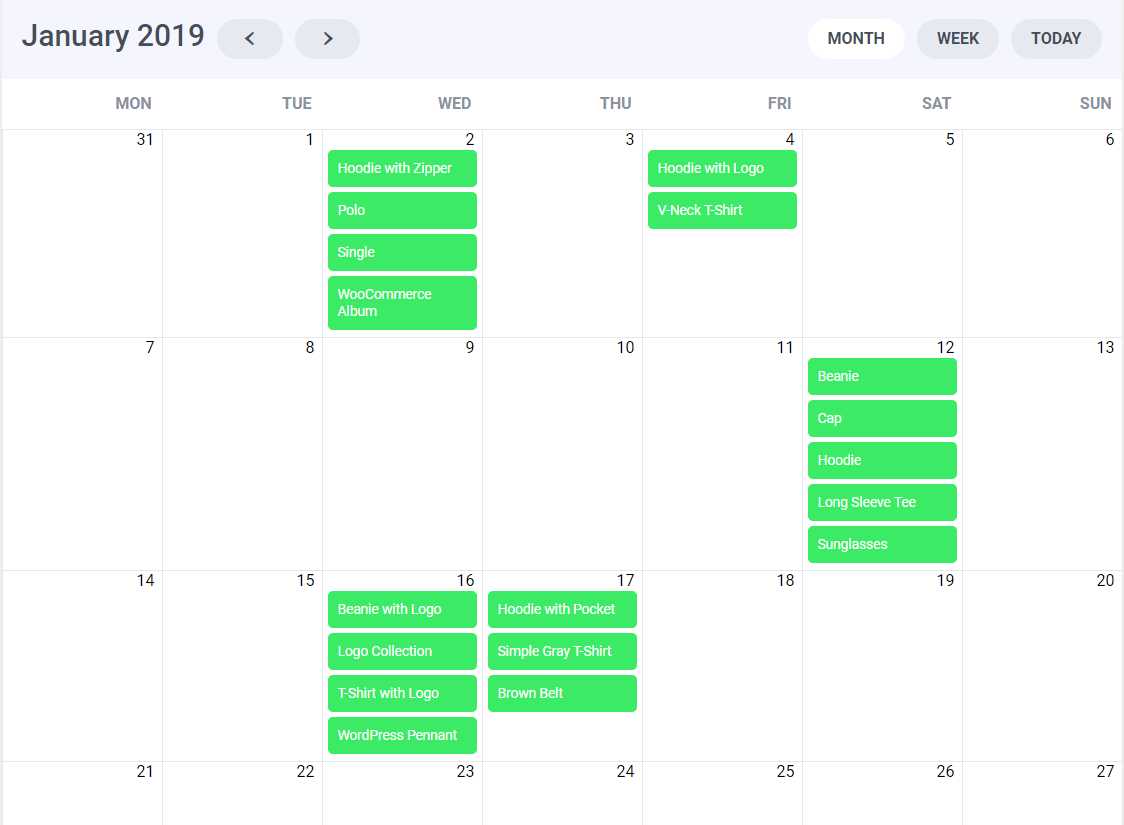
01. Month View
Month view displays the current month’s days, and usually a few days of the previous and next months, in a table-like format.
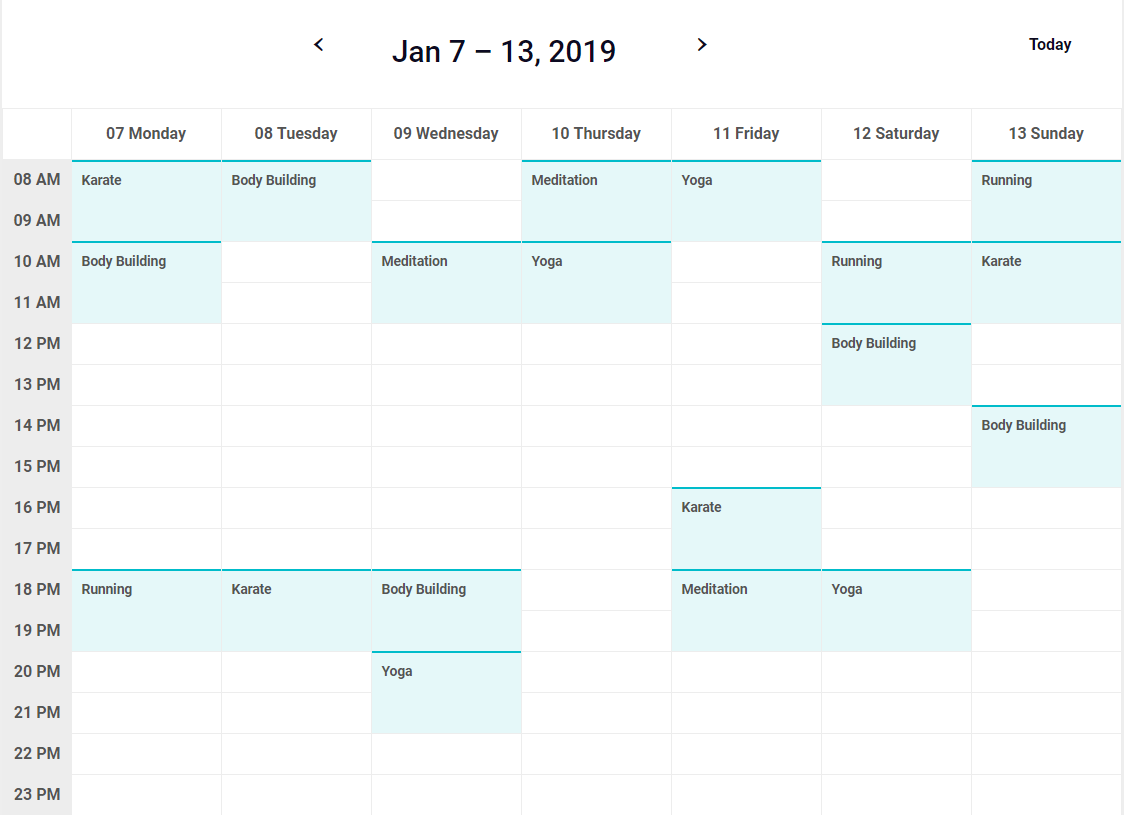
02. Agenda View
Agenda view displays one horizontal day axis as well as an axis of time on the vertical axis. The two predefined agenda views are agendaDay and agendaWeek.
03. List View
A list view displays events in a simple vertical list for a specific interval of time. If there are no events during a specific interval of time, you can show your custom message (eg. No events available). There are 4 preset list views: listDay, listWeek, listMonth, and listYear.

04. Basic View
A “basic” view is a view with one or more columns, each representing a day. The pre-configured basic views are basicDay and basicWeek.
Themes
In order to style your form easier, you can select between 11 cool themes.
- Month Green
- Month Bordered Blue
- Month Black Rounded
- Month Orange
- Agenda Week Purple
- Agenda Week Turquoise
- Month Minimal Blue
- Month Minimal Orange
- Month Minimal Pink
- List Year Orange Square
- List Year Purple Rounded
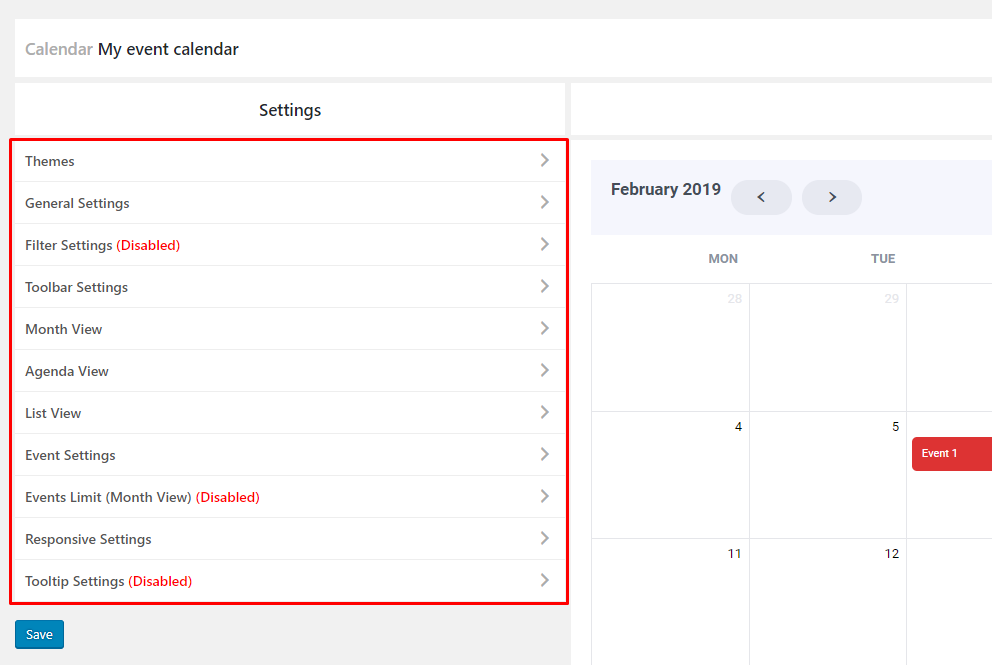
Style settings
The style options are logically divided into 11 subsections as seen on the image below.
- Themes
- General Settings
- Filter Settings
- Toolbar Settings
- Month View
- Agenda View
- List View
- Event Settings
- Events Limit (Month View)
- Responsive Settings
- Tooltip Settings
Event clicking
What happens when the user clicks on an event on a calendar? You have 3 available options.
Option 1: Go to event URL
This is the default action and nothing is needed to be done.
Option 2: Do nothing
Go to Calendar Setup > Calendars and click the calendar row.

An accordion will unfold with the calendar's options. Select the Manage click for each event separately option.
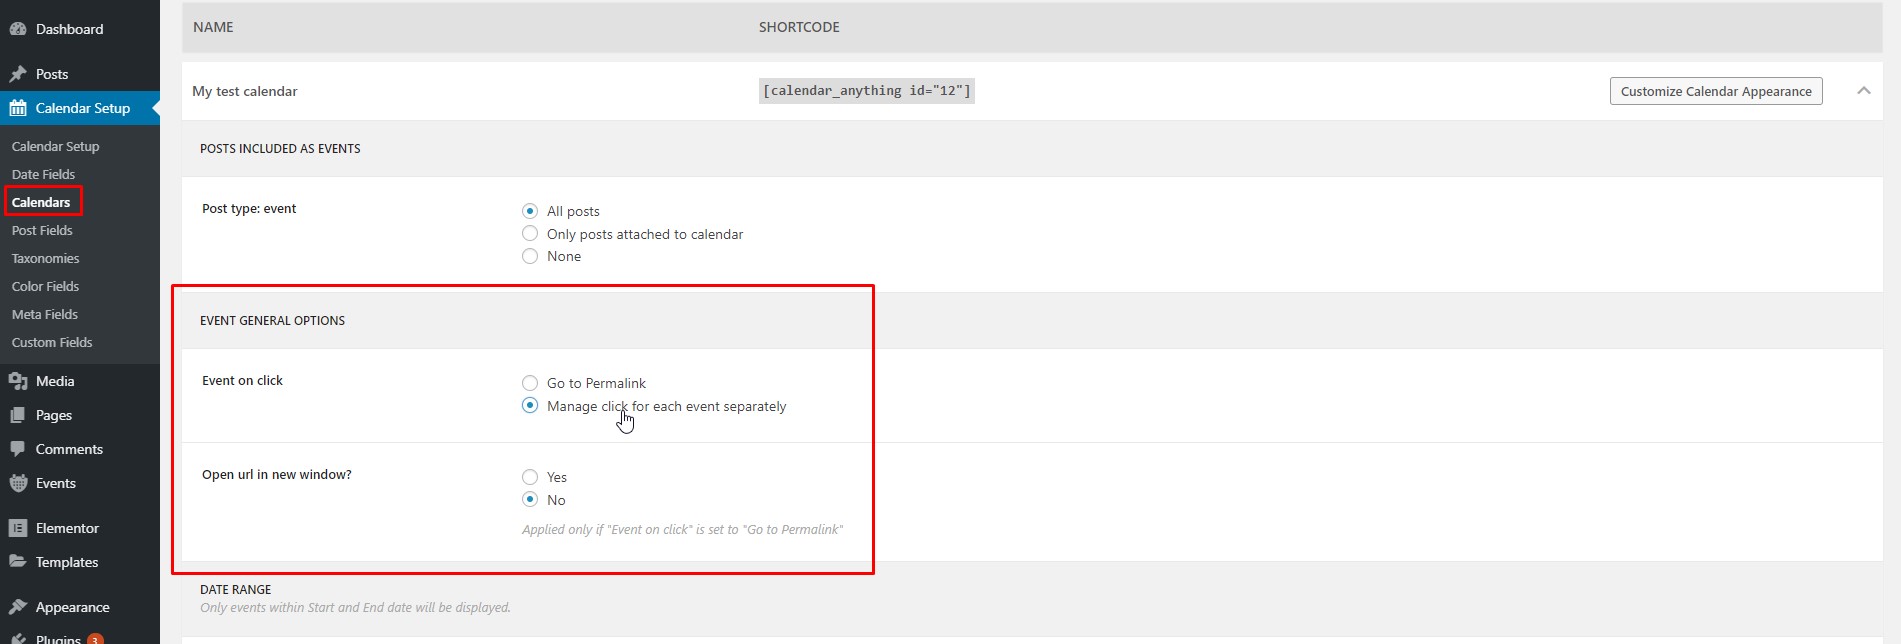
By doing so, the event click action is now defined by an option inside the event itself (which by default is off).
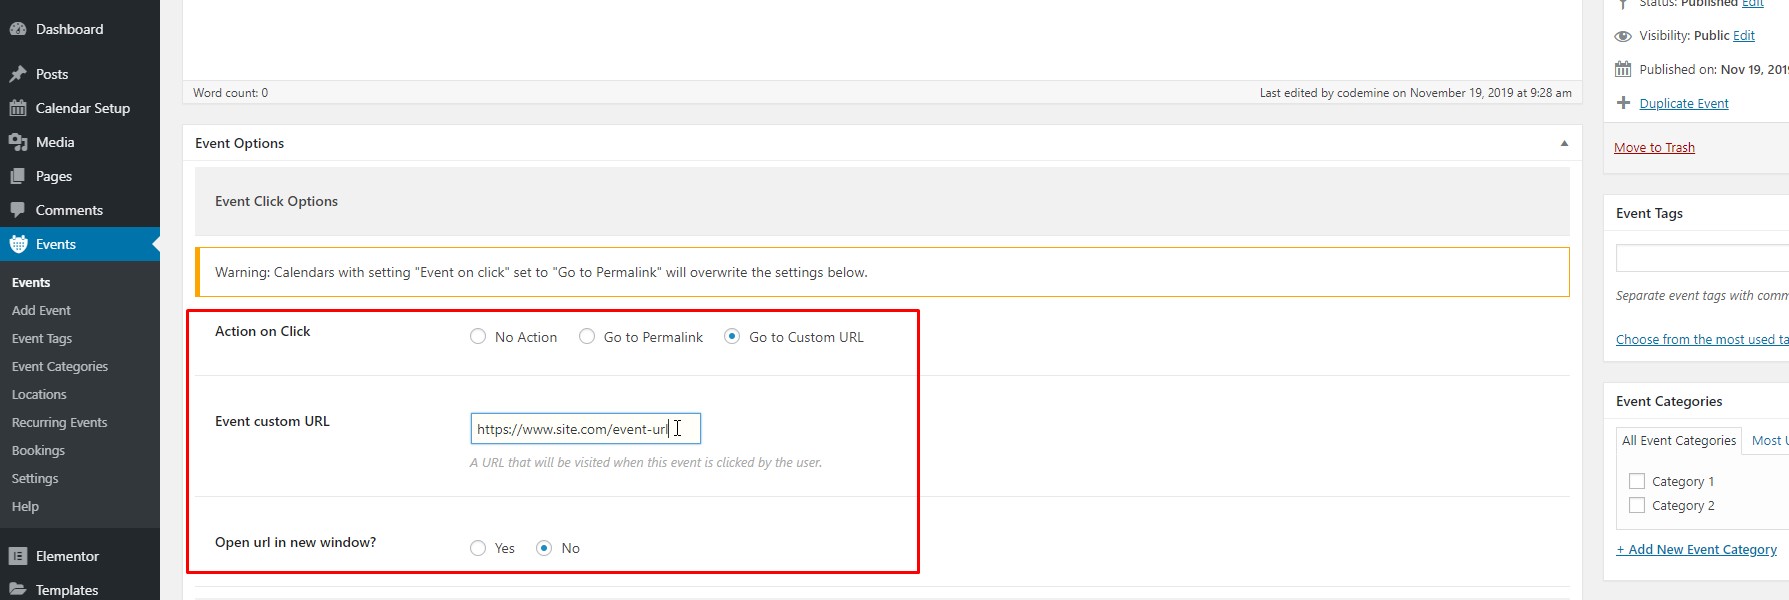
Option 3: Go to custom URL
If you want to send the event to a different URL, you can do so by going inside the event and click the Go to Custom URL option.
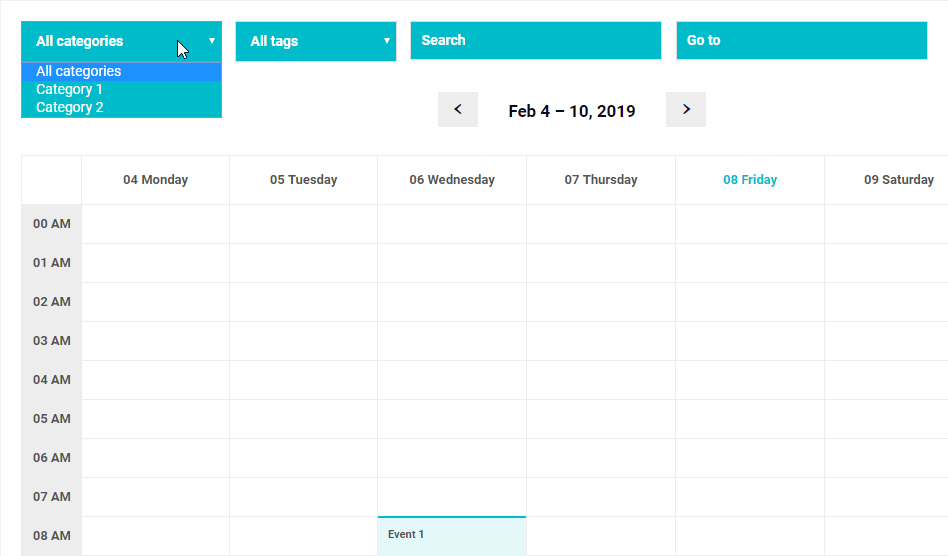
Filtering
With our plugin, you have the ability to add filtering buttons above the calendar. This is really useful for events that are organized in categories and/or tags.
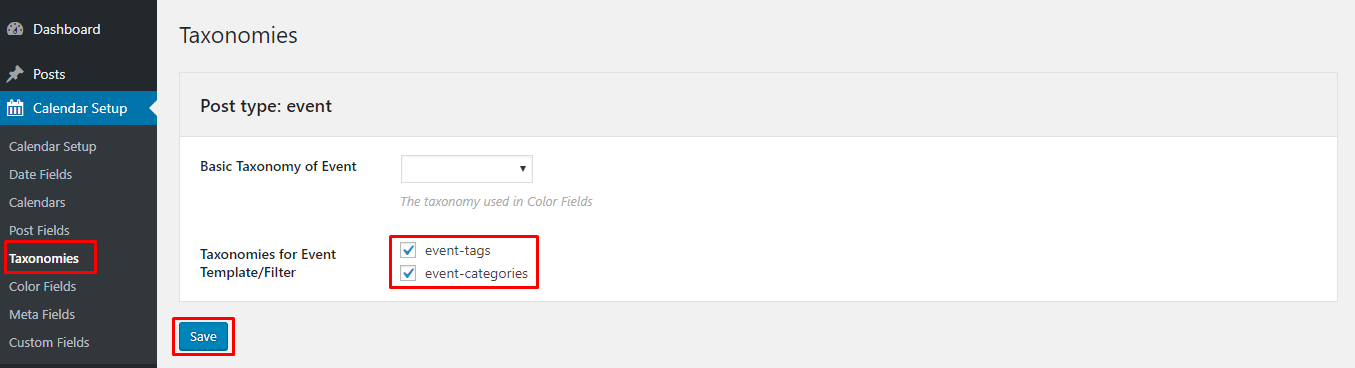
Step 1: Add the taxonomies as filtering options
Click the Calendar Setup > Taxonomies button on the menu. Here you will see the available taxonomies for your custom post type. In our case, we have 2 taxonomies, an event category and an event tag. By selecting the desired taxonomies, you will be given the ability in step 4 to add the taxonomies at the filtering toolbar. Let's select both taxonomies and click Save.
Step 2: Enable filtering
Now we have to turn filtering on. To do so, go to Calendar Setup > Calendars and click the Customize Calendar Appearance button.
Next, click Filter Settings and tick the Enable selection at the Enable/Disable Filter option.

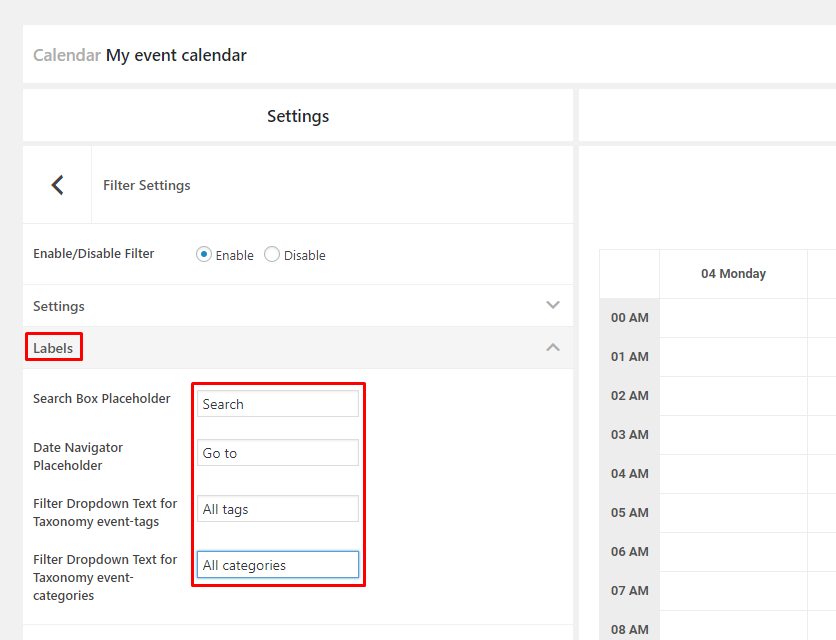
Step 3: Label your filters
Let's add some labels to our filters. Click the Labels button and fill in the options with the desired texts as seen below.
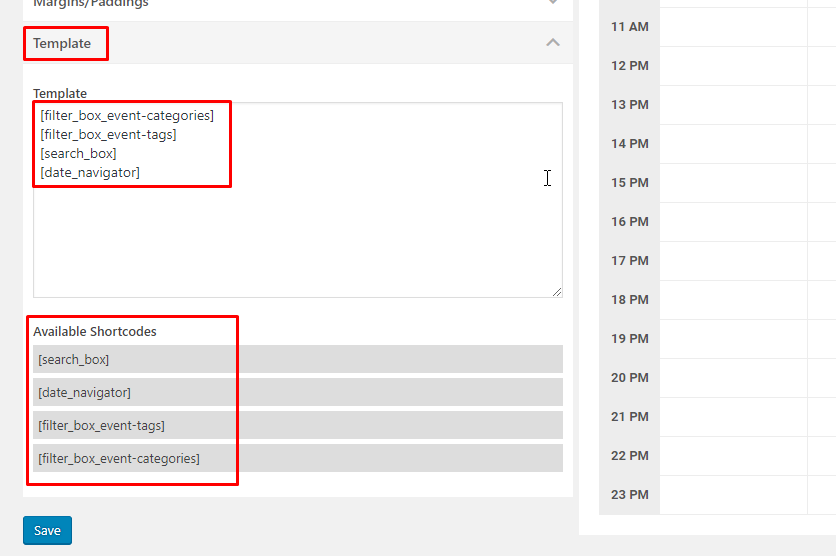
Step 4: Add filtering buttons
Lastly, we have to add the desired filtering button with the desired order. To do so, click the Template button and add the desired shortcodes as seen below. For your convenience, you can find the available template shortcodes below the input field.
The result
And here is the result.
Event templates
With our plugin, you have the ability to fully customize the content of each event.
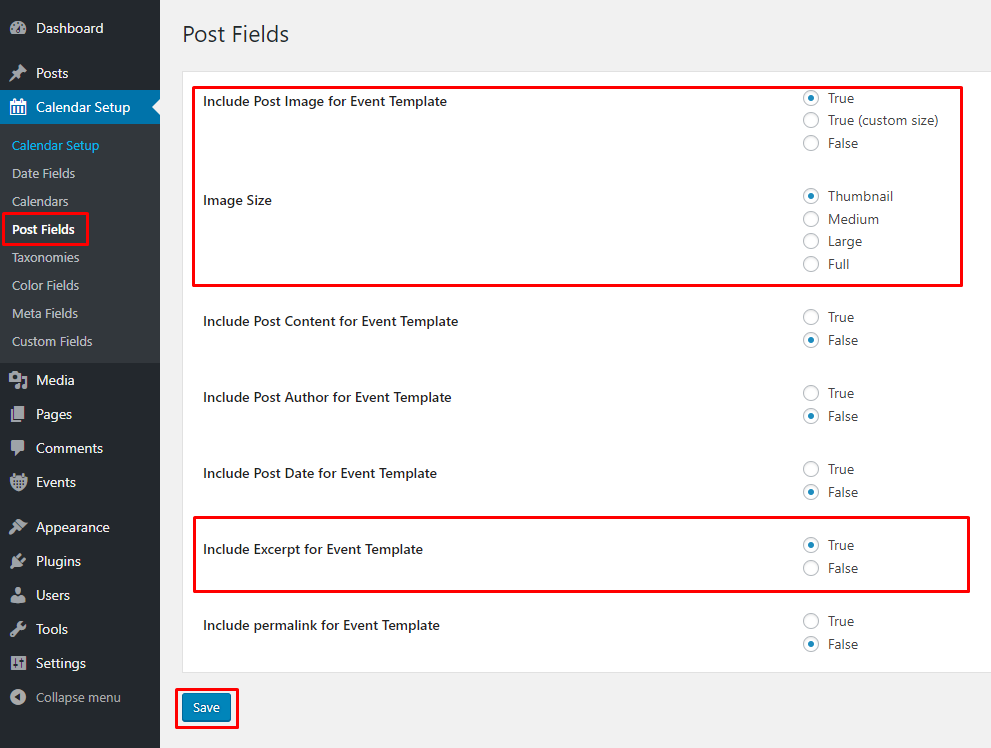
Step 1: Select extra post fields
Click the Calendar Setup > Post Fields button on the menu and select the features that you want to use at the event template. Let's say that we want to show at the event template, the event's title, excerpt, start/end time and feature image. Select the featured image and excerpt and click Save (the title and start/end times are by default visible as a shortcode in the template and ready-to-use).
Step 2 (optional): Select taxonomies
If you want, you can show the event's taxonomies at the event template. To do so, click the Calendar Setup > Taxonomies button on the menu and select the taxonomies for the post type that you want to be able to show at the event template. If you do so, in step 3 below, you can select the taxonomy shortcode you want to show, eg. [event-categories].
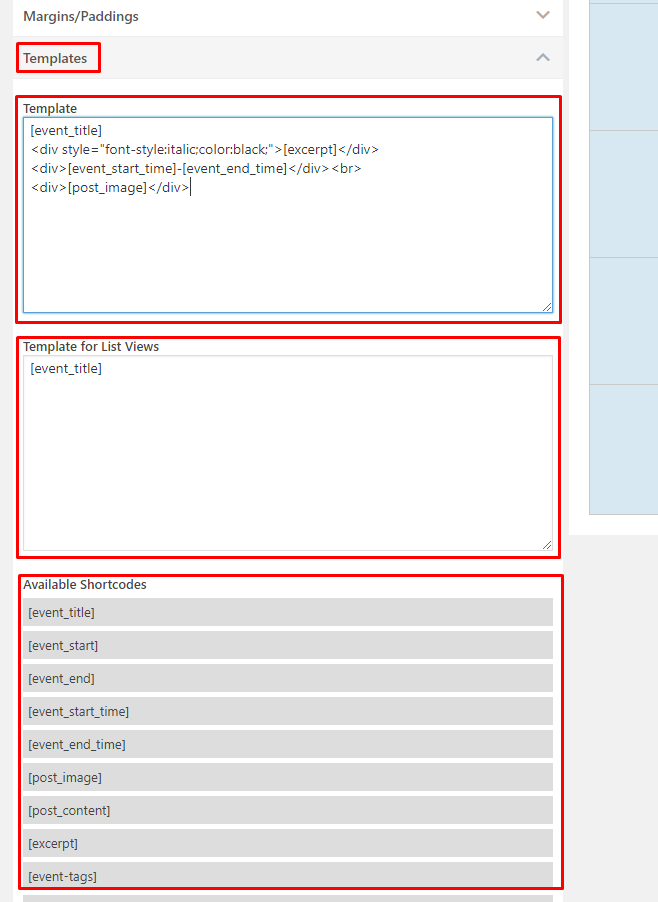
Step 3: Customize event template
Now go to Calendar Setup > Calendars and click the Customize Calendar Appearance button.
Click the Event Settings button.
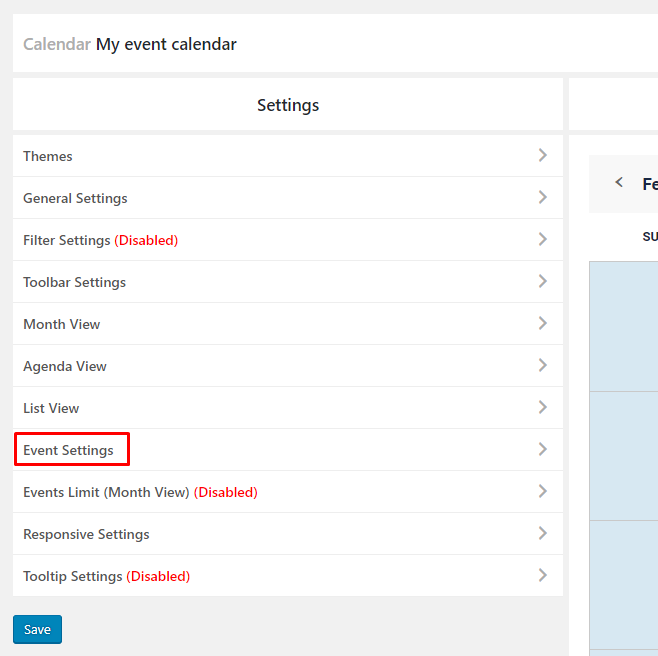
Here you can copy from the available shortcodes and paste them at the appropriate event boxes. With some basic HTML knowledge, you can make your event templates as complex as you wish!
The result
You can see our result below.

Dates format
You have the ability to set your own date format to various places in your theme. Here is a list of sections where you will find the date format settings.
- Month View
- Agenda View
- List View
- Event Settings
- Events Limit (Month View)
Date examples
YYYY-MM-DD |
2014-01-01 |
dddd, MMMM Do YYYY |
Friday, May 16th 2014 |
Time examples
hh:mm a |
12:30 pm |
Date cheatsheet
d |
0..6 | Weekday |
dd |
Su | |
ddd |
Sun | |
dddd |
Sunday | |
YY |
13 | Year |
YYYY |
2013 | |
M |
1..12 (Jan is 1) | Month |
Mo |
1st..12th | |
MM |
01..12 (Jan is 1) | |
MMM |
Jan | |
MMMM |
January | |
Q |
1..4 | Quarter |
Qo |
1st..4th | |
D |
1..31 | Day |
Do |
1st..31st | |
DD |
01..31 | |
DDD |
1..365 | Day of year |
DDDo |
1st..365th | |
DDDD |
001..365 | |
w |
1..53 | Week of year |
wo |
1st..53rd | |
ww |
01..53 |
Time cheatsheet
H |
0..23 | <24h hour |
HH |
00..23 | |
h |
1..12 | 12h hour |
hh |
01..12 | |
m |
0..59 | Minutes |
mm |
00..59 | |
s |
0..59 | Seconds |
ss |
00..59 | |
a |
am | AM/PM |
A |
AM |
Custom fields
With our plugin, you have the ability to add and show custom fields at your event templates. Let's say that you are using the calendar's events and that each event should have a text custom field that we want to show on the calendar.
Step 1: Create your custom field
Go to Calendar Setup > Custom Fields and create your custom field.
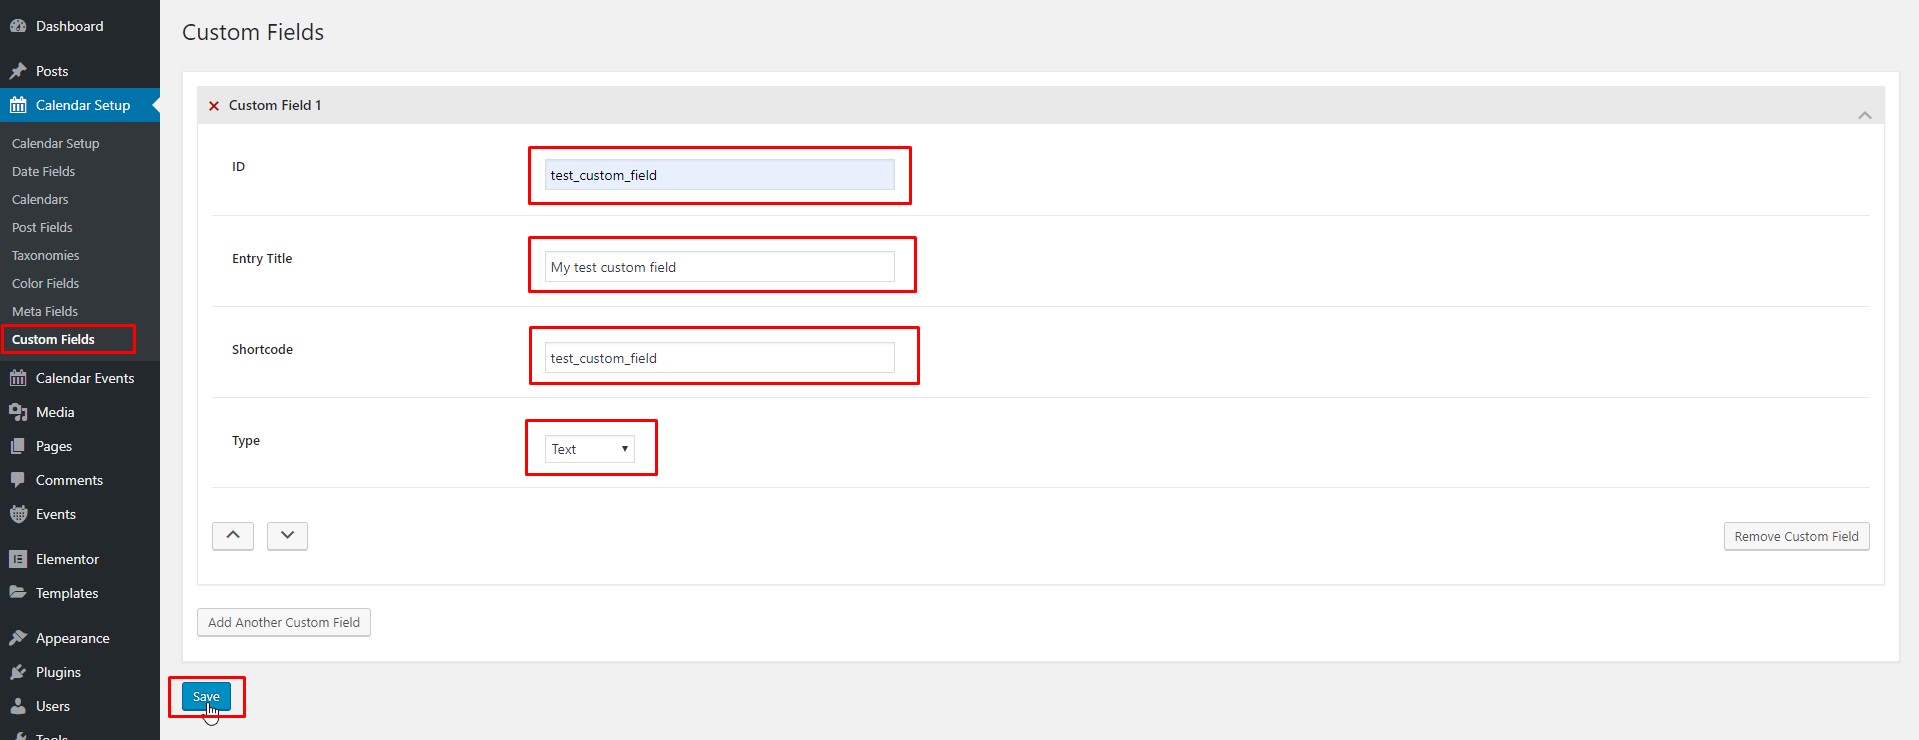
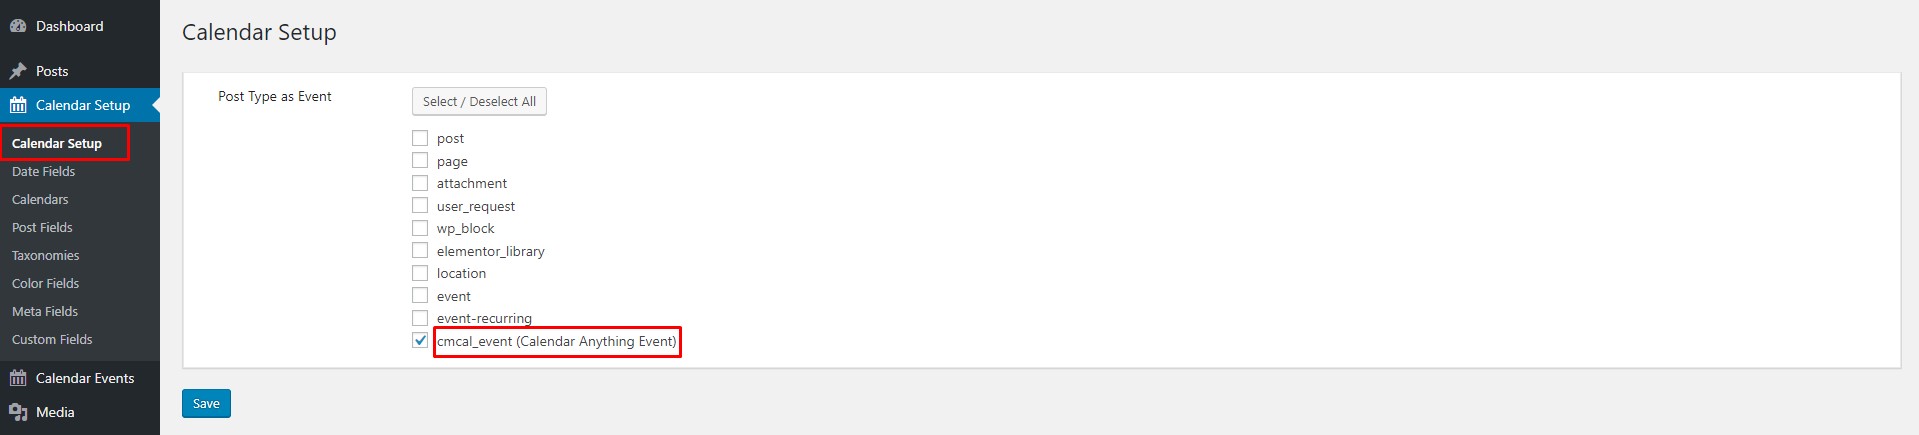
Remember that this field, will be visible ONLY on our events. To ensure that you are using our events, go to Calendar Setup and make sure that our event, cmcal_event (Calendar Anything Event), is checked.
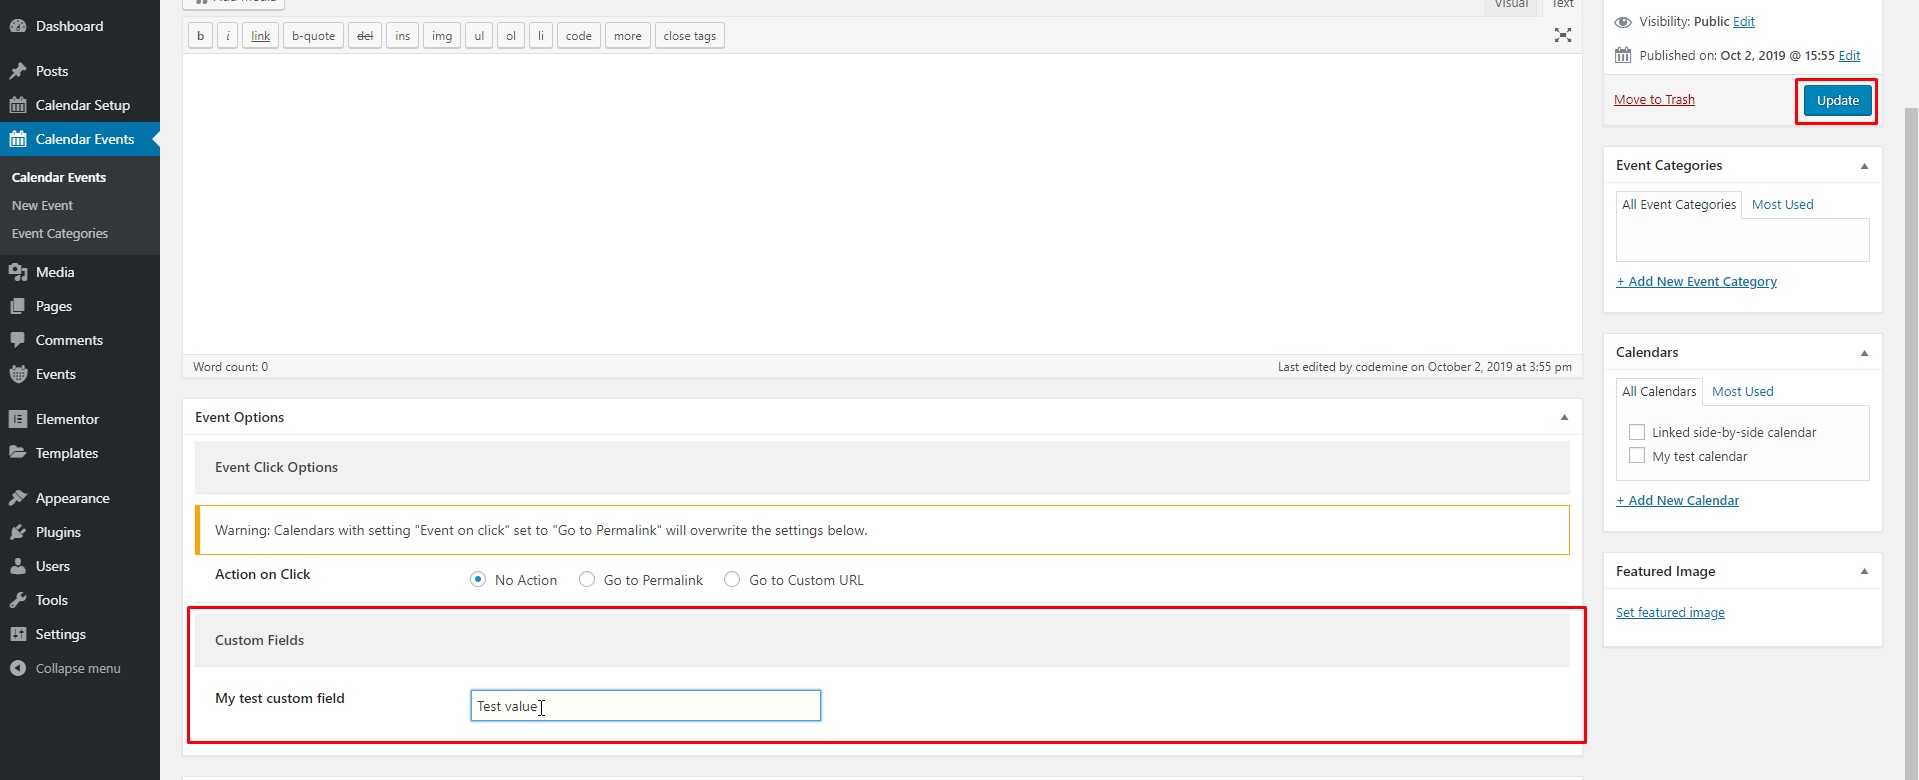
Step 2: Open your event
Go to Calendar Events and open your event.

Step 3: Insert your custom field value
You will now see your custom field in your event.
Step 4: Open you calendar

Step 5: Add you field in your event template
Go to Event Settings > Templates and insert your custom field in your event template.

Custom fields (external)
What if you are using your own custom field plugin (like ACF) and want to show a field inside the event template?
Step 1: Select your custom field
Go to Calendar Setup > Meta Fields and tick the custom field you want to show.

Step 2: Add you field in your event template
Go to Event Settings > Templates and insert your custom field in your event template.
Event coloring
With our plugin, you have the ability colorize each event inside your calendar. Let's say that each event should have a background color that is defined from it's taxonomy background color.
Step 1: Select the basic taxonomy
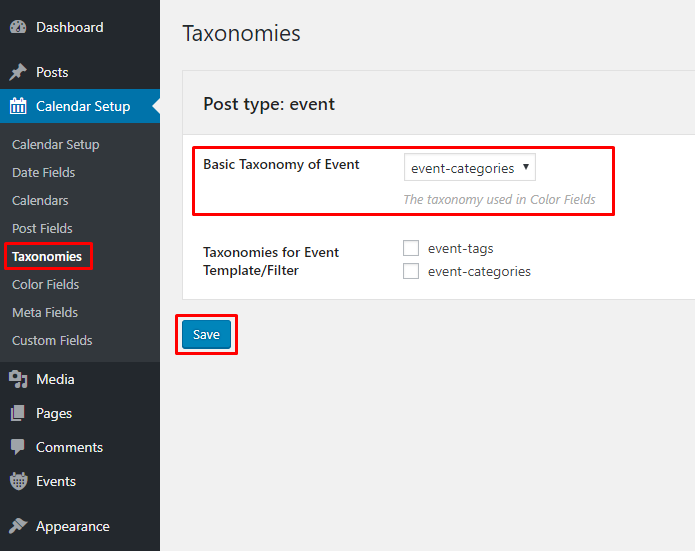
First, you must select the basic taxonomy from which we will take the colors for the event. To do so, click the Calendar Setup > Taxonomies button on the menu, select your basic taxonomy from the dropdown and click Save.
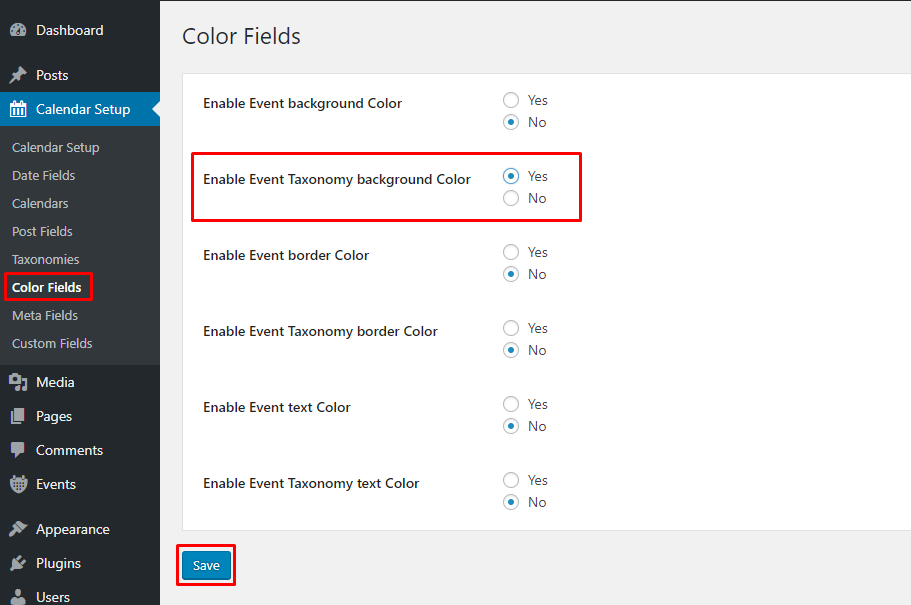
Step 2: Select color fields
Then, you must define which color options will be visible at the taxonomies. To do so, click the Calendar Setup > Color Fields button on the menu. In our example we want to change the background color only, depending on the taxonomy color.
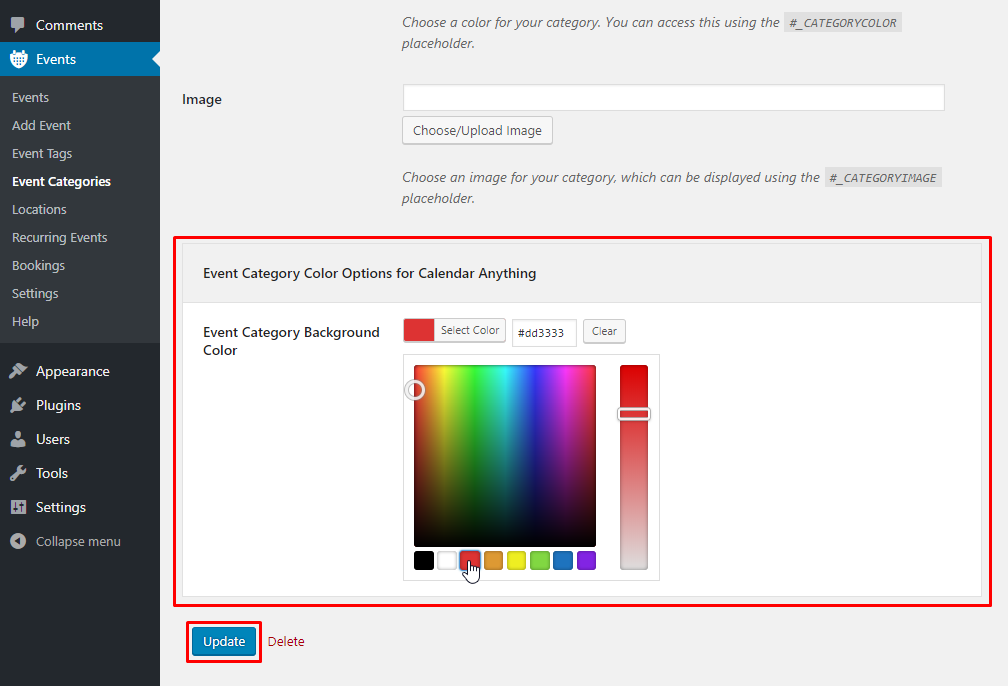
Step 3: Colorize your categories
Now, you have to add colors to your categories. The colors you will add will define the colors of the events that belong to the categories. To do so, first go to the categories page. In our example, since we are using the Events Manager plugin, we do so by clicking Events > Event Categories and by clicking the Category 1.

You are now inside the category. If you scroll down, you will see a new section Event Category Color Options for Calendar Anything. Here you can define the color of your category.
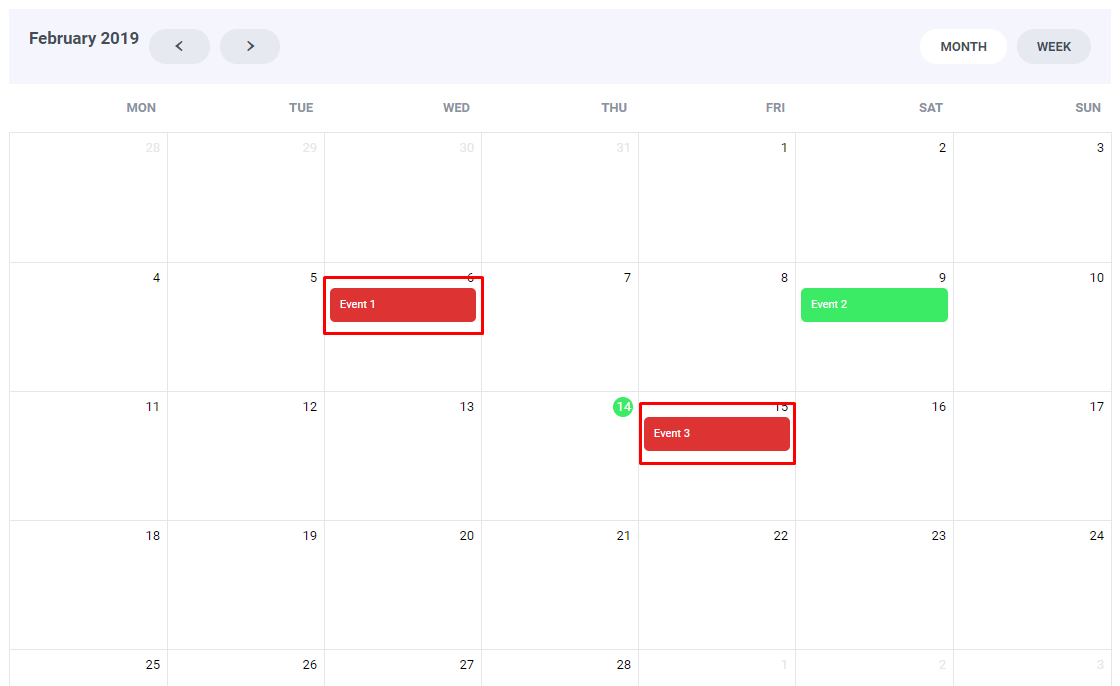
The result
And here is the result. All events that belong to the Category 1, have now a red background, the one that we set before.
Show specific events
By default, the calendars you create show all posts of the custom post type you have selected. But you also have the ability to select which specific events will be visible in the calendar. To do so:
Step 1: Set the setting
First, you must say that the calendar will only include your selected posts. To do so, click the Calendar Setup > Calendars button on the menu, select your basic taxonomy from the dropdown and click Save.

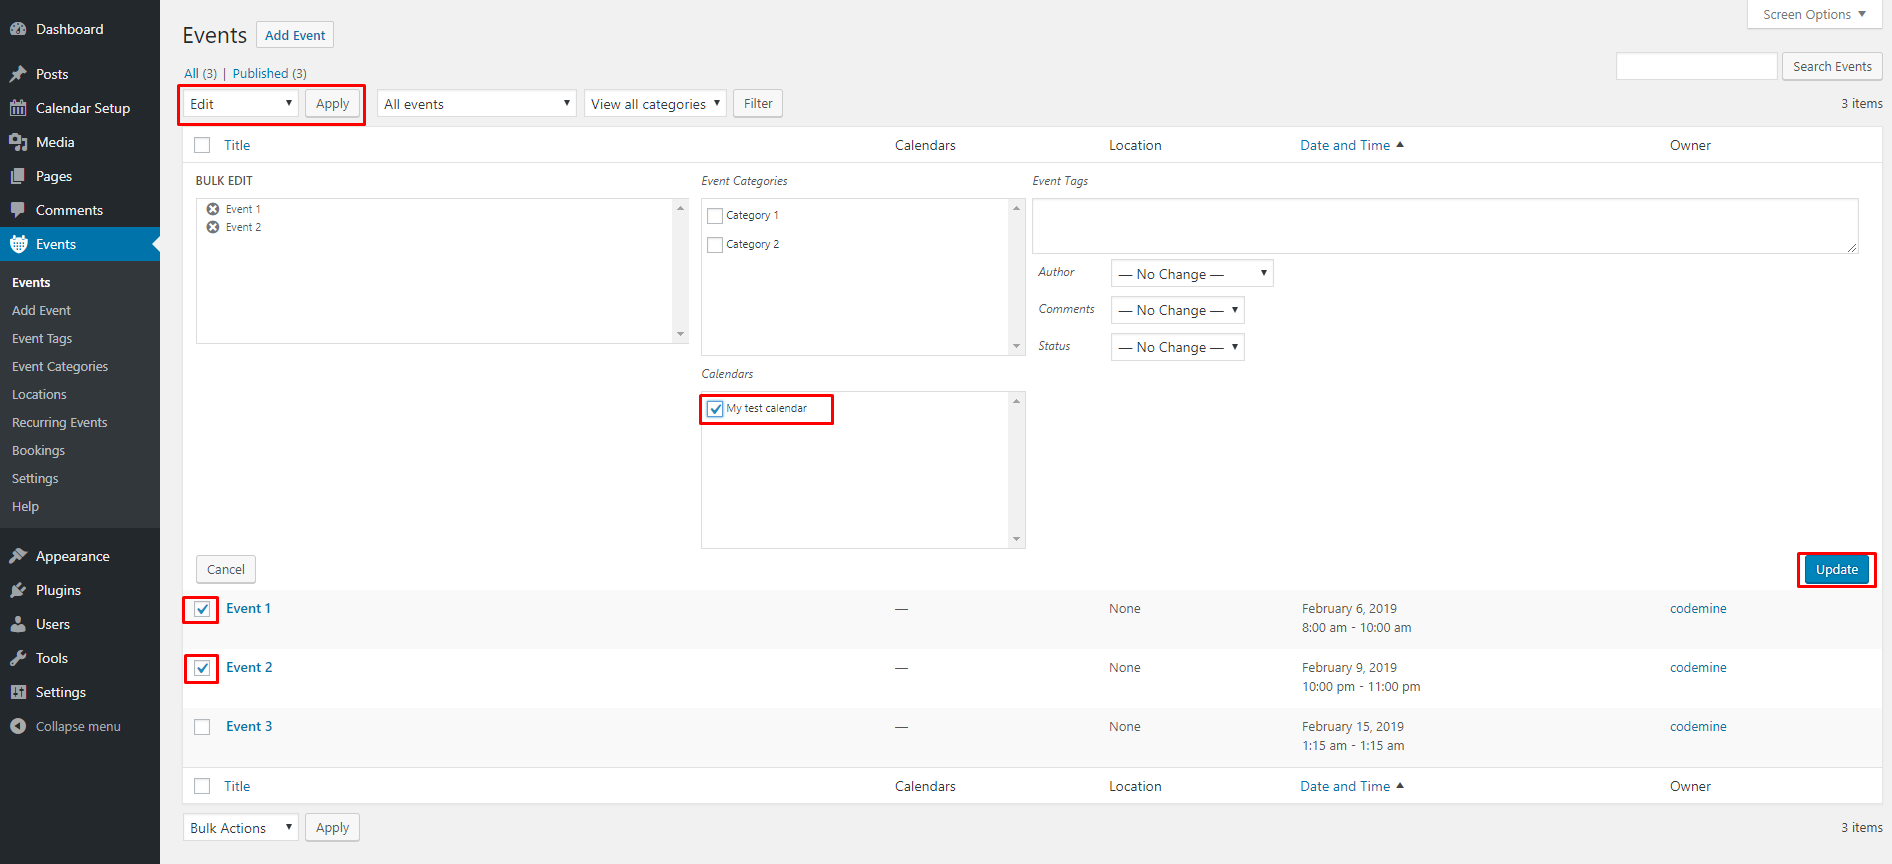
Step 2: Select the events
You can now select the desired events. To do so, go to your events page and bulk-select them as seen below.
The result

Repeatable events
In order to add repeatable events, follow the steps below:
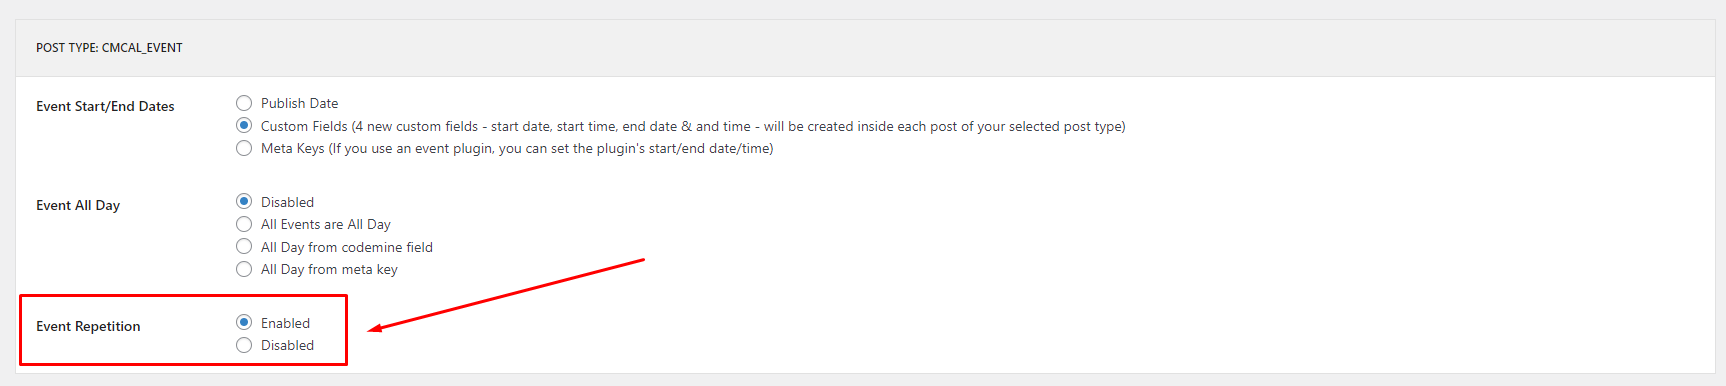
1. Go to Calendar Setup > Date Fields and enable the event repetition option for your post type (if you use our plugin's event system, you should do so for the CMCAL_EVENT post type, as seen in screenshot below).
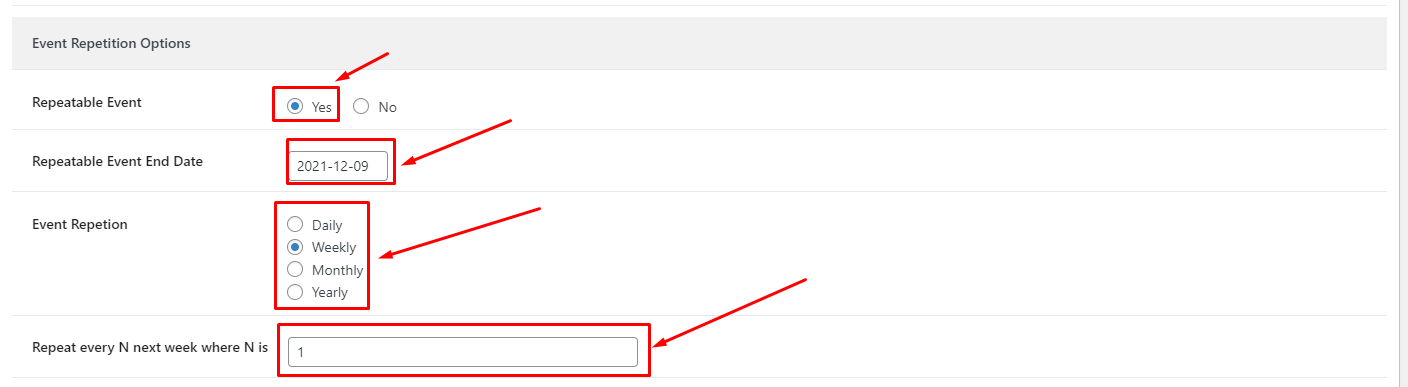
2. Go to Calendar Events (if you use our plugin's event system) and open the desired event that you want to make repeatable.
3. In the Event Repetition Options, set repeatable event to yes, set your end date, and if you want it to be daily, weakly, monthly, or yearly along with the every option. For example if you want to make a weekly event, see our screenshot below.
If you want to create a repeatable event that does not follow a strict pattern (eg. each week, day etc.) you can use the Event Certain Dates Repetition Options and add there as many events as you want.
Booking
By default, our plugin does not provide a booking functionality for your events. As a workaround, you have the following 2 solutions:
Solution 1: Use WooCommerce
You can use WooCommerce, create your products (which in reality will be your events) and then add these products to the calendar. This way, the user when clicking on the event, will be redirected to the product's page, where will be able to add the product (event) to the cart.
Solution 2: Use an event booking plugin
You can use your desired event booking plugin and attach these events to the calendar. For example, the Events Manager plugin has a booking feature for it's events. So, you can create events, enable the booking feature on them and then add these events to the calendar. This way, the user when clicking on the event, will be redirected to the event's page, where will be able to book the event.
Date Range
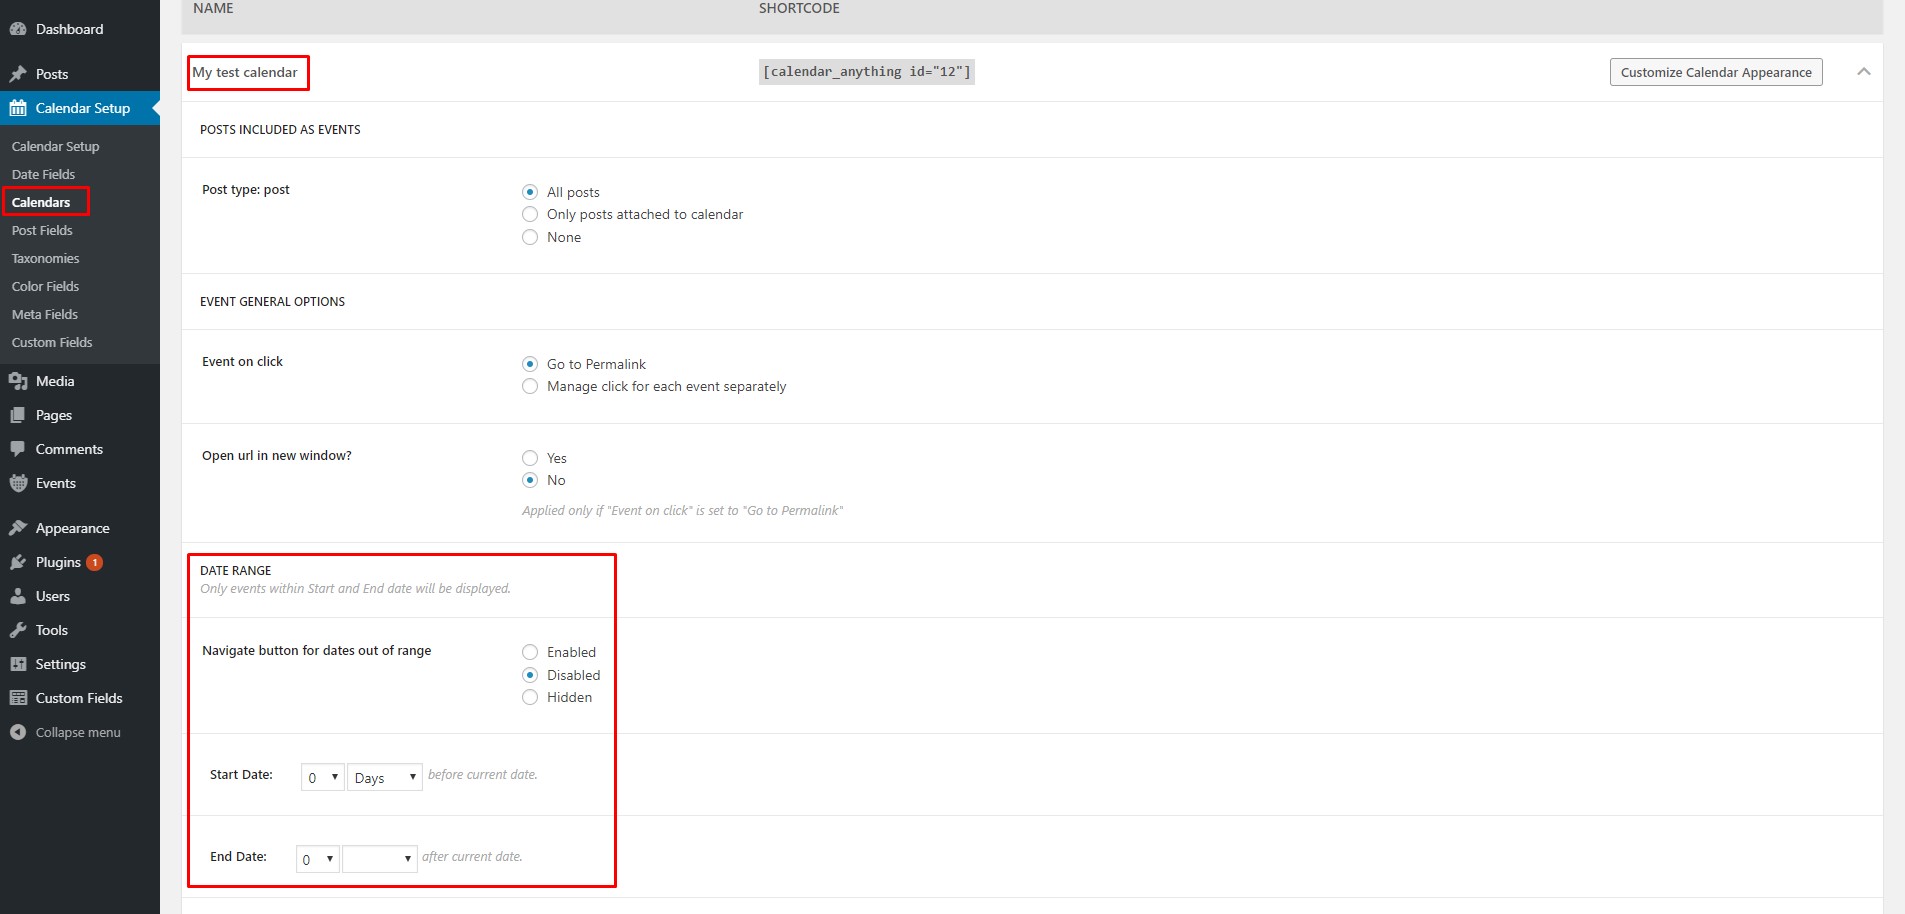
Let's say that you want to hide all past events. To do so you can use the Date Range section:
- Go to
Calendar Setup > Calendars. - Click the row of the desired calendar.
- To hide all past events, just set 0 Days for the Start Date option as seen on the image below.
- Click
Save.
Navigate to other calendar
Let's say that you want the following scenario: you have 2 calendars side-by-side. On the left a month view and on the right a list day view. When you click the event dates on the left calendar (the month view), you want to see on the right the day events in a list day view. To do so:
- Create a calendar for the list day view (the right one). Select the theme, customize it and make sure that you select the List Day as the default view.
- Copy the calendar's ID.
- Create a calendar for the month view (the left one). Select the theme, customize it and make sure that you select the Month as the default view. This calendar should have the same custom post type as the other one.
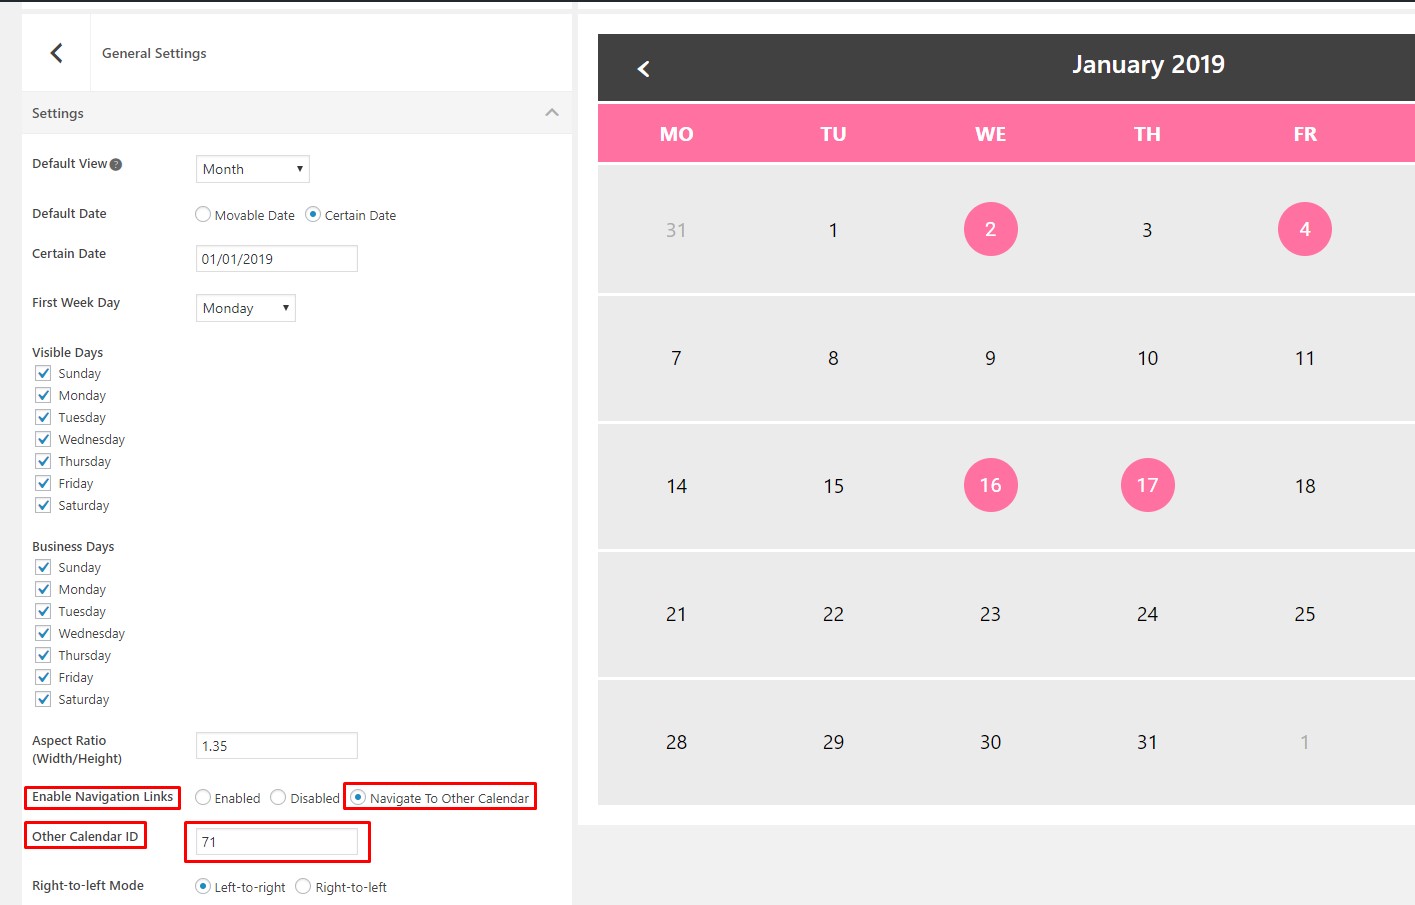
- Go to
General Settings > Settings. - In the
Enable Navigation Linksoption, tick theNavigate To Other Calendar - In the
Other Calendar IDoption, paste the ID from step 2.
Bear in mind, that if you add a filter to the left calendar, it will filter the events in both calendars.
Import/Export
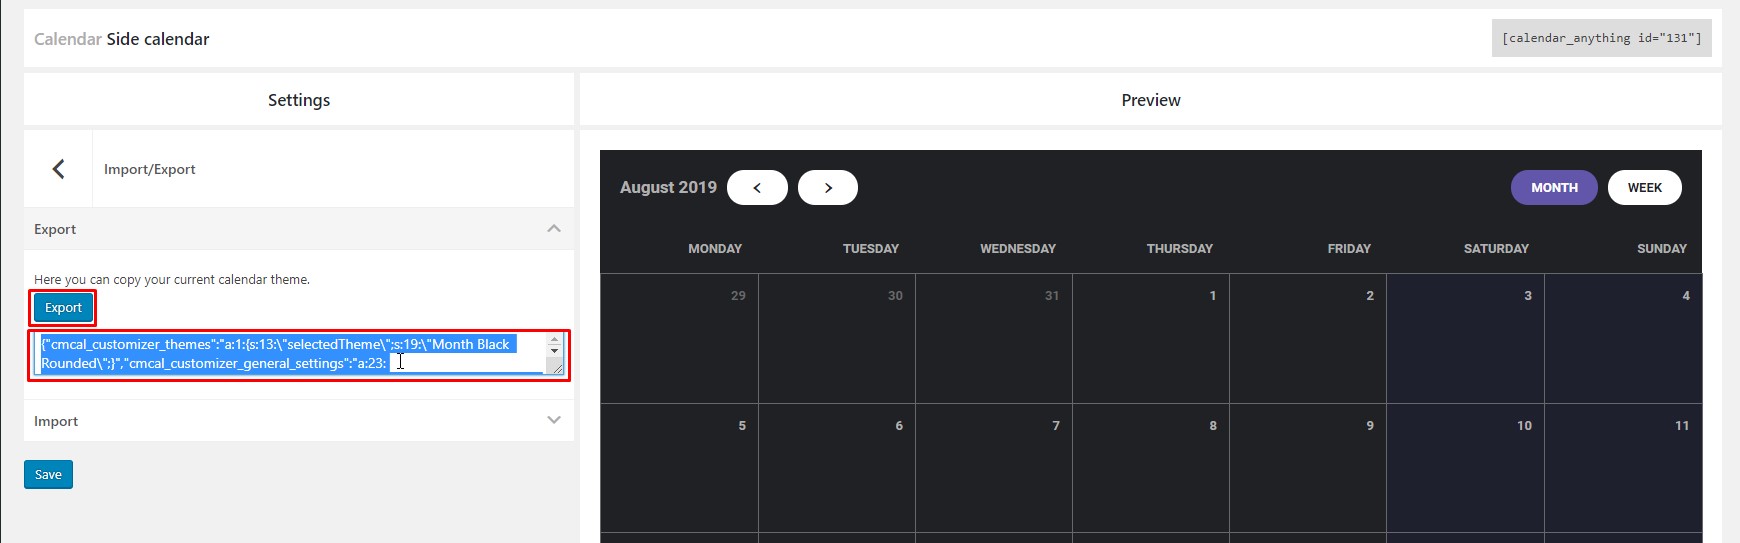
- Go to the calendar you want to export.
- Go to
Import/Exportsection. - Click
Exporttab. - Click
Exportbutton. - Copy the code that will appear in the box below.
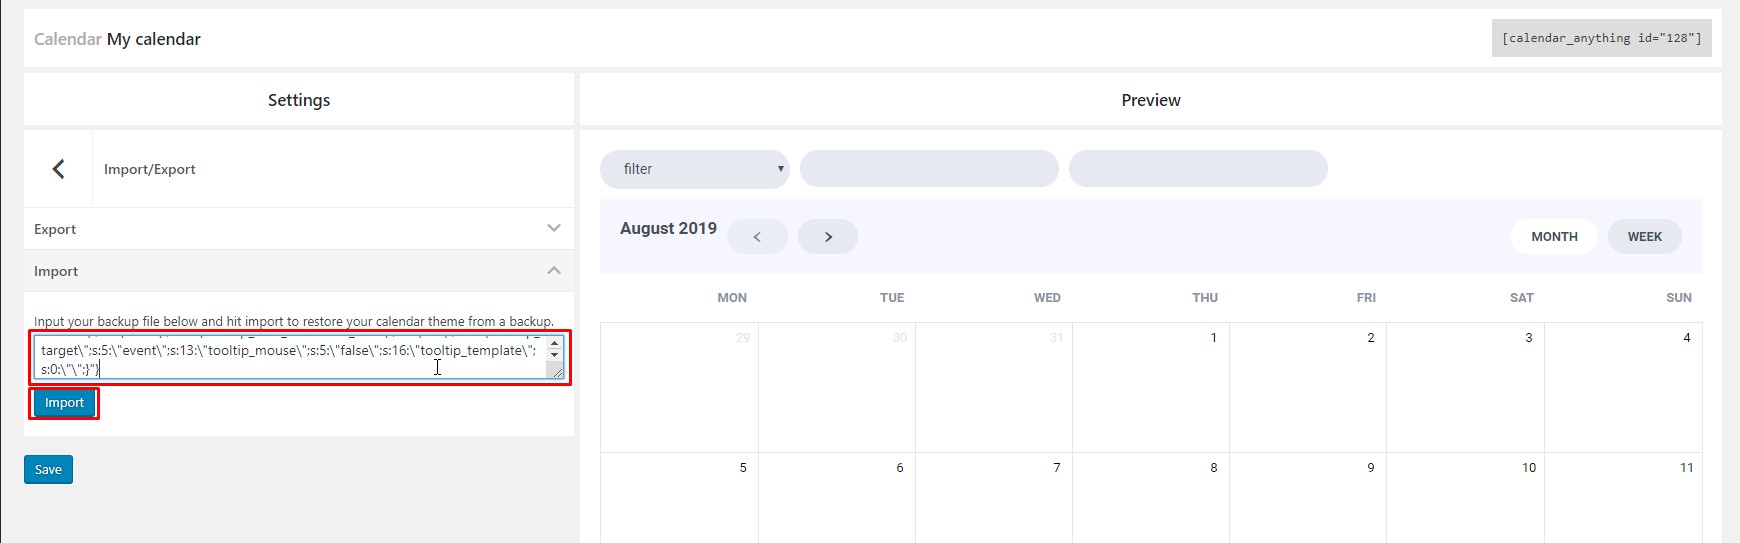
- Go to the calendar you want to import your theme.
- Go to
Import/Exportsection. - Click
Importtab. - Paste the code from step 5 in the box.
- Click
Importbutton.
Tested plugins and proper setup
Here is a list of plugins with which Calendar Anything is compatible along with the proper meta key setup:
To do so, at your WordPress backend, click the Date Fields button on the menu and select the Meta Keys option. A list of 4 options will be populated below. Just select the desired fields and press Save.
| Plugin name | Start date meta key | Start time meta key | End date meta key | End time meta key |
| Events Manager | _event_start_date |
_event_start_time |
_event_end_date |
_event_end_time |
| WPLMS Learning Management System | vibe_start_date |
Tested themes and proper setup
Here is a list of themes with which Calendar Anything is compatible along with the proper meta key setup:
| Theme name | Post Type as Event | Start date meta key |
| My Listing | job_listing |
_job_date |
Changelog
02.10.2021 version 2.27
- Fix - iCal fix
24.08.2021 version 2.26
- Fix - Bug repeating certain dates
05.05.2021 version 2.25
- Fix - Event URL when post status draft and open in new window fixed
16.03.2021 version 2.24
- Fix - CMB2 plugin update for compatibility with Rank SEO
09.03.2021 version 2.23
- Add - Javascript event cmcal_after_datesRender
19.02.2021 version 2.22
- Fix - Remove PHP warning for repeatable events
18.01.2021 version 2.21
- Fix - Wrap text in events
06.11.2020 version 2.20
- Add - Date/time picker in backend filter
- Fix - Filter taxonomy dropdown when taxonomy is applied to multiple post types
31.10.2020 version 2.19
- Fix - Multiple post types taxonomy fix
13.09.2020 version 2.18
- Fix - Colorize event category in list view
24.08.2020 version 2.17
- Fix - Wrong first day label of year for some timezones
03.08.2020 version 2.16
- Fix - Performance optimization - Enqueue scripts only when using shortcode
20.06.2020 version 2.15
- Fix - Event custom URL with special characters in it
30.04.2020 version 2.14
- Add - Localize plugin and create pot file for backend translation
13.04.2020 version 2.13
- Fix - Solve incompatibility with CMB2 taxonomy plugin
08.04.2020 version 2.12
- Fix - Ajax event rendering bug fix
- Fix - Optimize performance for month view (days with events calculation)
07.04.2020 version 2.11
- Fix - Change frontend scripts priority for compatibility with WooCommerce Event Manager
- Add - Filter cmcal_frontend_scripts_priority for changing frontend scripts priority
04.04.2020 version 2.10
- Add - Add cmcal-pastday-event class to past-day events
09.03.2020 version 2.9
- Add - Ability to add the repetition to certain dates
22.02.2020 version 2.8
- Fix - Polylang compatibility
19.01.2020 version 2.7
- Fix - Featured image in event width
- Fix - Frontend calendar rendering issues with theme
25.11.2019 version 2.6
- Fix - Toolbar selected button mode fix
- Fix - List year hover CSS fix
- Fix - List year event padding CSS fix
06.11.2019 version 2.5
- Fix - Frontend calendar rendering issues with theme
- Fix - Timezone event misplace on month view
24.10.2019 version 2.4
- Fix - Bug with multiple calendars and selected option to show list view events in descending order
- Add - Ability to add custom dropdown filters to calendar through WordPress filters
23.10.2019 version 2.3
- Add - Option to show list view events in descending order
17.10.2019 version 2.2
- Add - iCal Feed
15.10.2019 version 2.1
- Add - Option to exclude specific dates for repeating events
09.10.2019 version 2.0
- Add - Update FullCalendar javascript library to v4.3.1
- Add - List Duration view
25.09.2019 version 1.30
- Add - Default event duration option
- Fix - Agenda view slot duration zero value
22.09.2019 version 1.29
- Fix - Navigate to other calendar bug fix
- Fix - Calendar custom fields bug fix
16.09.2019 version 1.28
- Add - Custom CSS option
06.09.2019 version 1.27
- Add - Ability to add custom code to the event template through filters
04.09.2019 version 1.26
- Add - Ability to change toolbar title text with custom js code
29.08.2019 version 1.25
- Add - 3 new helper filters
- Fix - All day event expand to multiple days fix
25.08.2019 version 1.24
- Fix - Make filter work as expected for side-by-side calendars
- Add - Import/export functionality
21.08.2019 version 1.23
- Fix - Same shortcode multiple times in event template bug fix
17.07.2019 version 1.22
- Fix - Backend color fields CSS fix
16.07.2019 version 1.21
- Add - Navigate to other calendar feature
16.07.2019 version 1.20
- Fix - Event Manager plugin conflict
08.07.2019 version 1.19
- Fix - Day cyrillic fix for serbian language
04.07.2019 version 1.18
- Fix - Date range fix for empty event's end date
13.06.2019 version 1.17
- Fix - Repeating event default value
21.05.2019 version 1.16
- Fix - Add calendar styles in head using WordPress wp_add_inline_style
20.05.2019 version 1.15
- Fix - Frontend calendar rendering issues with theme
- Fix - Time in agenda week view
- Fix - PHP notices
12.05.2019 version 1.14
- Fix - Event template date format language
06.05.2019 version 1.13
- Add - Modal option for tooltips
02.05.2019 version 1.12
- Fix - Out of range date bug fix
21.04.2019 version 1.11
- Fix - Remove PHP warning
04.04.2019 version 1.10
- Add - Add extra post type parameter to cmcal_event_start_end_date filter
29.03.2019 version 1.9
- Fix - Create new event bug fix
22.03.2019 version 1.8
- Fix - Timezone fix
- Fix - PHP version 7.2 error
12.03.2019 version 1.7
- Fix - Gutenberg compatibility fix
- Add - Repetition at certain dates option
11.03.2019 version 1.6
- Fix - Gutenberg compatibility fix
- Fix - Localization fix
10.03.2019 version 1.5
- Add - 'cmcal_calendar_posts_query' filter
- Add - 'cmcal_show_calendar' filter
06.03.2019 version 1.4
- Fix - iPad fixes for safari
06.03.2019 version 1.3
- Fix - Remove warning on backend
05.03.2019 version 1.2
- Add - Update FullCalendar javascript library to v4.0.0-beta.2 (2019-02-06)
03.03.2019 version 1.1
- Fix - Remove mixed content error
19.02.2019 version 1.0
- Initial release